
Why this really happens.
Many spider plant enthusiasts know the sight: a dense, deep-green Chlorophytum comosum that looks perfectly healthy, yet produces none of its characteristic hanging “plantlets”. These miniature rosettes are a major part of the plant’s appeal – and the easiest way to grow new plants. Even so, some spider plants remain “childless” for years. This is not down to chance, but to several clear signals that Chlorophytum comosum responds to.
How the spider plant decides when to produce plantlets
Spider plants are naturally highly effective at reproducing. In the wild, they can cover entire areas with young plants. Indoors, however, they usually only begin doing so when three factors are right: age, energy reserves and surroundings.
As a rule, a spider plant does not properly get going until it is around one to two years old. Before then, it directs most of its energy into leaves and roots. Its thick, fleshy roots act as storage organs. Only once sufficient reserves have built up does producing plantlets become worthwhile for the plant.
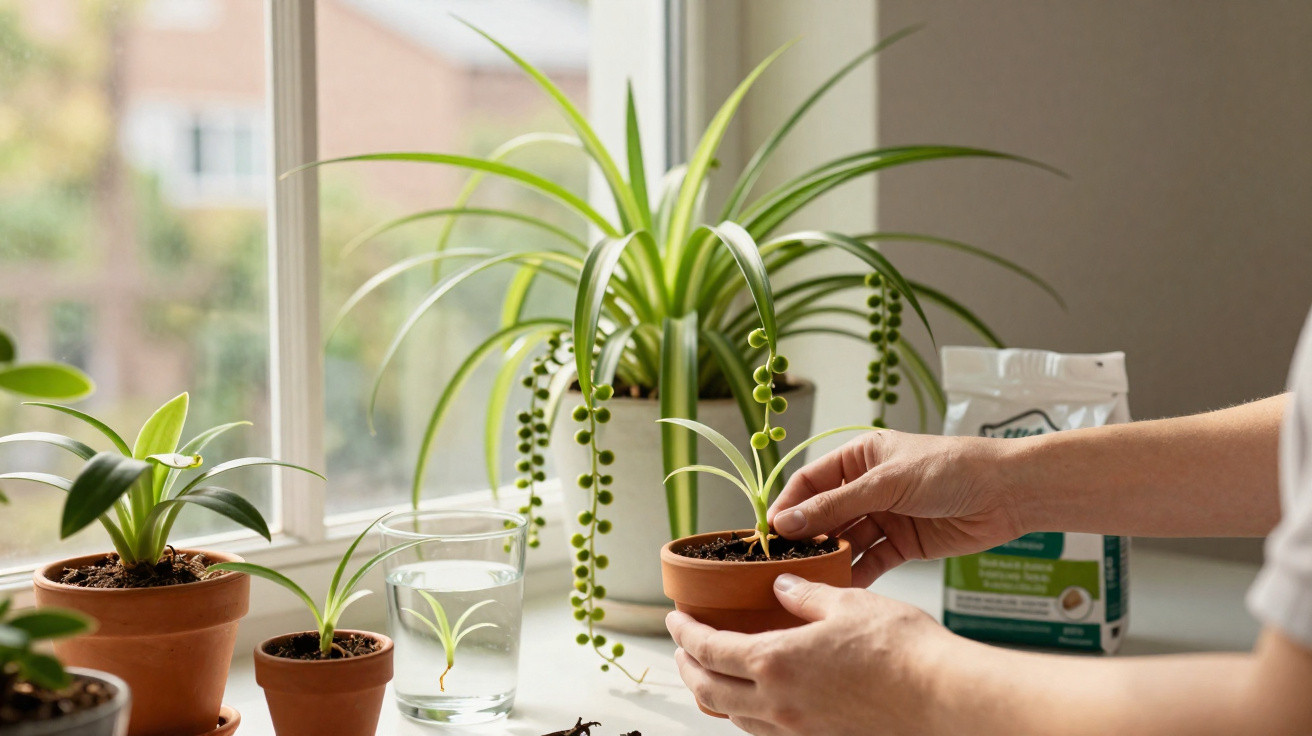
The young plants develop on long, arching shoots known as stolons. Small leaf rosettes form at their ends, already resembling miniature versions of the parent plant. They often start to grow their own roots while still attached to it.
A spider plant mainly produces plantlets when it feels “secure” – but is under slight stress.
That may sound contradictory, but it is entirely typical: when the plant is in a bright spot, growing well, slightly root-bound and not receiving excessive nutrients, it switches into reproduction mode. It puts less energy into new roots and more into offspring that can spread into the surrounding area.
Why light levels are often the hidden issue
Many spider plants are placed somewhere within a room, far from a window. They may still look “fine” there, but the brightness is not enough for them to form plantlets. They do not need blazing sunshine, yet they are not shade plants either.
The best place by a window
A position directly beside an east- or west-facing window is ideal, giving the plant plenty of light without harsh midday sun. A south-facing window can also work if a sheer curtain or some distance provides protection. North-facing windows are often too dark, especially during winter.
Another commonly overlooked factor is the length of time the plant receives light. Spider plants respond to day length. Keeping one beneath a bright lamp all the time removes this seasonal cue.
- A bright windowsill without full sun
- No permanent artificial light late into the evening
- Ideally, fewer than 12 hours of light per day for several weeks
Receiving fewer than twelve hours of light per day for three to four weeks encourages the plant to produce flower stems. The small plantlets then develop from the inconspicuous flowers. Excessively long lighting, on the other hand, keeps the spider plant in continuous growth mode rather than reproduction mode.
Pot size, fertiliser and watering: the quiet obstacles
The second major reason for a lack of plantlets is an overly comfortable life in the pot. A recently repotted spider plant surrounded by lots of compost, fertilised regularly and kept constantly moist may look magnificent, but it has no reason to “reproduce”.
Why a tight pot works better
Spider plants prefer being slightly pot-bound. Handling them with too much care and moving them into a noticeably larger pot every year removes an important reproduction signal.
A pot that is too large can delay plantlet production by months or even years.
Use these guidelines when repotting:
- Repot only when roots are growing from the drainage holes or the pot is visibly bulging.
- Choose a pot no more than one size larger.
- A typical schedule is around every two years.
In a slightly tight pot, the plant invests less in making new roots and is more likely to use its stored energy for stolons and plantlets.
Measure fertiliser carefully rather than overindulging the plant
Too much fertiliser promotes vigorous leaf and root growth, while slowing reproduction. A relatively modest feed is entirely sufficient for producing plantlets.
A reliable routine using standard houseplant fertiliser is:
- From spring to late summer: roughly once a month, at a slightly lower dose than the manufacturer recommends.
- In autumn and winter: either not at all, or very weakly no more than once every two months.
Feeding every week or using highly concentrated solutions keeps a spider plant in permanent growth mode, in which it is unlikely to form many plantlets.
Watering with a gentle stress effect
Watering habits provide another trigger. Constantly wet compost feels “too comfortable” to the plant. Allowing it to dry out slightly between waterings creates mild stress that instead encourages plantlet formation.
- Let the top layer of compost dry out well between waterings.
- Water a little more often in summer and considerably less in winter.
- Avoid waterlogging and use a pot with a drainage hole.
This gentle drying cycle, combined with a tight pot and moderate fertilising, is often the deciding factor that brings out the first stolons.
How to tell when it is the right time to separate them
Once small leaf rosettes with tiny roots appear on the hanging shoots, things become exciting. Not every plantlet is immediately ready to leave the “parent household”.
Suitable plantlets already have:
- at least 4–5 leaves
- initial, clearly visible roots
- a firm attachment to the stem and no soft or mushy areas
Spring or summer is generally the best time. Newly potted plants establish themselves more quickly then and are more forgiving of minor care mistakes.
Three methods for rooting spider plant plantlets safely
1. Straight into compost – quick and uncomplicated
The simplest approach needs no container of water:
- Cut the plantlet from the shoot with clean scissors or a sharp knife, leaving around 2 cm of stem beneath the rosette.
- Fill a small pot with loose, free-draining compost.
- Set in the plantlet, firm it gently and water it in.
- Keep the compost lightly moist, but never wet.
Young spider plants prefer gentle brightness away from direct sun and temperatures of between 18 and 22°C. In these conditions, they root securely within a few weeks.
2. Grow the first roots in water, then move it into a pot
Anyone who enjoys seeing what happens below the surface can opt for the water method:
- Separate the plantlet cleanly and place its base in a glass of water.
- Submerge only the lower section; the leaves should remain dry.
- Change the water every few days so that nothing starts to rot.
- After one to three weeks, once the roots are around 3 cm long, plant it in compost.
This method is particularly suitable for beginners because the progress can be monitored. After moving into compost, the young plant needs a few days to adjust, but it usually grows quickly afterwards.
3. Keep it attached: root it in compost before separating
This is a very reliable, though somewhat more involved, method: the plantlet initially remains connected to the parent plant.
- Place a small pot of compost beside the main pot.
- Lay or position the plantlet so that its base touches the compost, while leaving the connecting shoot attached.
- Moisten the compost regularly until the plantlet has anchored itself securely.
- Only then cut the shoot between the parent plant and the young plant.
This technique is also known as layering, or “light air layering”, and is suitable when the parent plant is already standing on a large saucer.
Common mistakes that prevent a flood of plantlets
If no plantlets appear despite your efforts, check the following points again:
| Problem | Likely cause | Solution |
|---|---|---|
| Lots of leaves, no plantlets | Too much fertiliser, pot too large | Reduce feeding and delay repotting |
| Pale, limp leaves | Too little light, compost too wet | Move closer to a window and allow breaks between watering |
| Little growth overall | Plant too young or lacking nutrients | Wait longer and feed moderately from spring onwards |
| Plantlets dry out quickly | Air too dry, sun too strong | Provide a bright but shaded spot and raise humidity |
Why the effort is worthwhile – and what else to bear in mind
A well-balanced spider plant can become a genuine source of plants for friends, family or an office. By removing plantlets systematically, you can soon create a small “production” system: mature plants supply new young plants year after year, and these in turn begin producing their own plantlets after one to two years.
Spider plants also filter pollutants from indoor air and are considered resilient when minor care errors occur. With the adjustments described above – light duration, pot size, fertiliser and watering rhythm – they can be encouraged out of their comfortable routine without causing them harm.
One further point that is often missed is temperature. Spider plants grow best between 18 and 22°C. Below 10°C, they suffer noticeably, especially if the compost is wet. If you put the plant on a balcony in summer, protect it from cold nights and intense midday sun. Outdoors, it may produce even more plantlets, provided the light and temperature are suitable.
Once these signals are understood, you can control your spider plant’s propagation rather effectively. Rather than wondering why plantlets fail to appear, a small change of position, less frequent fertilising and a more relaxed approach to repotting are often enough – and the first “cascade of plantlets” will usually not be long in coming.



Comments
No comments yet. Be the first to comment!
Leave a Comment