
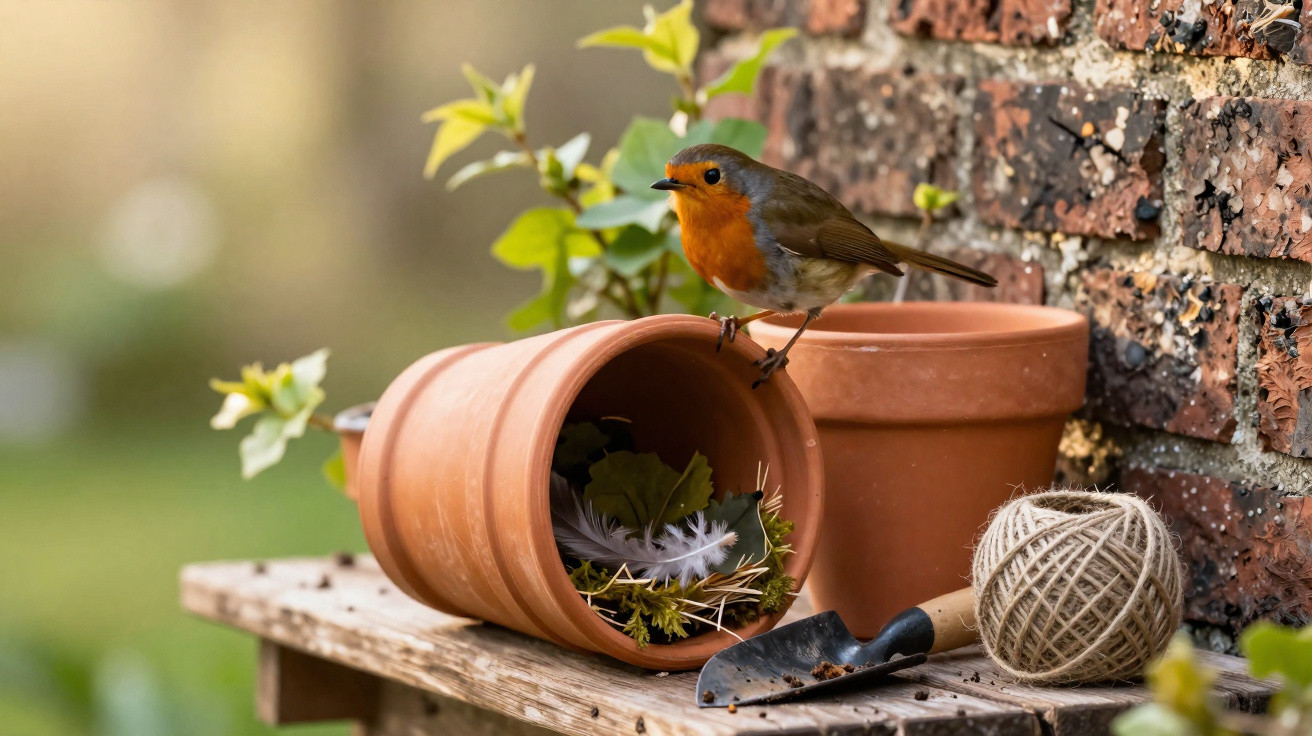
But anyone who genuinely wants to help robins needs to understand their nesting secret.
Many gardeners put up expensive nest boxes, then wonder why robins ignore them. This small bird with its orange-red breast behaves differently from tits or sparrows. Rather than wanting a tall box with a tiny entrance hole, it looks for a low, open hideaway. This is where an unassuming helper comes in: an old terracotta flowerpot, positioned and prepared properly.
Why robins have little use for conventional nest boxes
The European robin (Erithacus rubecula) seems familiar: it follows a gardener’s spade, collects insects and perches very close to people. When choosing a breeding site, however, it is far more selective. Many standard wooden nest boxes are intended for species such as tits, sparrows or starlings – rather than robins.
Robins are regarded as semi-cavity nesters. They do not use narrow cavities with a small entrance hole positioned two to three metres above the ground. Instead, they favour:
- open but well-protected niches
- low sites up to roughly chest height
- dense shrubs, ivy, woodpiles and banks
- hiding places that are barely noticeable from outside
A typical tit box fixed to a wall is simply of no interest to them. The bird seeks cover close to the ground, not a lofty vantage point.
“For a robin, the cost of a nesting site is not what matters, but the logic of its position: low, concealed, open and dry.”
Terracotta pot instead of a luxury nest box: why this method works so well
A basic unglazed terracotta flowerpot meets a surprising number of a robin’s requirements. It is sturdy, inexpensive and found in almost every garden – while, when used correctly, creating a microclimate that benefits young birds.
The benefits of unglazed terracotta
The material is crucial. An unglazed clay pot is porous and manages moisture more effectively than painted wood or plastic:
- Less condensation: Moisture does not settle as heavily inside, reducing the chance of chicks becoming chilled.
- Gentle heat retention: Clay absorbs some warmth during the day before releasing it slowly, helping to create a more stable climate.
- Natural appearance: Its colour blends discreetly into borders and hedges – ideal for a bird that values camouflage.
A wide opening is important. While tits need only a narrow entrance, robins appreciate a broad, semi-open “cave”. A pot measuring around 15 centimetres across is a suitable starting point.
How to turn a flowerpot into a robin nesting site
An old pot can be transformed into a practical shelter in only a few steps. It costs virtually nothing, although it does require a little care.
Choosing and preparing the right pot
- Choose the pot: Use an unglazed terracotta pot measuring 15–20 centimetres in diameter. Avoid plastic, painted and glazed versions.
- Clean it: Rinse it with plain water, removing soil and remnants of moss. Do not use washing-up liquid, vinegar cleaner or disinfectant.
- Remove labels: Take off stickers and tags so that nothing rubs or catches inside.
The pot should not later be set upright. Place it on its side or at a slight downward angle so rainwater cannot collect within it.
Arranging the inside: making the pot appear “already used”
Robins often build their nests within existing structures rather than on bare ground. The pot can therefore look slightly “pre-lined”:
- Add a thin layer of dry, clean leaves.
- Include a few small clumps of dry moss.
- Do not use feathers or hay from animal housing, as these can introduce parasites and germs.
The interior does not need to look perfect. Far more important is that it remains dry, loose and natural.
Positioning the terracotta pot correctly for robins
Even the best terracotta pot is useless in the wrong place. Robins follow a clear pattern when selecting a site.
Height, direction and surroundings
Recommended location criteria are as follows:
| Criterion | Recommendation |
|---|---|
| Height | Around 1 to 1.5 metres above ground level |
| Direction of the opening | Facing south-east, away from strong prevailing winds |
| Surroundings | Dense hedge, ivy, bank or an untidy corner |
| Light | Morning sun, but not a spot in full sun throughout the day |
| Disturbance | Away from paths, external doors and play areas |
Set the pot into vegetation so it is hardly visible from outside. A few twigs or tall grasses in front of the entrance are welcome, provided the bird can still fly in and out.
“For the robin, balance is key: well concealed from predators, yet quickly accessible in an emergency.”
Stability: nothing must wobble
The pot must sit completely securely. A shaky shelter is rarely accepted. It can be stabilised using:
- wire securing the pot to a branch or fence
- pieces of wood or stones to stop it rolling away
- twigs that “wedge” the pot in place without obscuring the opening
Decorative touches, bright colours and garlands are more likely to deter wild birds. Keeping everything understated and natural is the better approach.
The right time: when the terracotta pot should be in place
Robins begin preparing to breed early in the year. Anyone wishing to help should act in good time. The ideal period is from late February to mid-March. By then, many birds are already looking for a site but have not yet settled on one.
If the pot is put out much later, it may still serve as a hiding place or daytime shelter, but is less likely to be used for breeding. Planning early significantly improves the chances.
Alternatives and additions that also work in the garden
The terracotta pot is not the only possibility. Robins may also use the following in gardens:
- old watering cans laid on their sides
- upturned buckets with an opening cut into the side
- discarded window boxes, partly hidden beneath shrubs
- gaps in woodpiles or dense ivy
All these options should follow the same principle: a low position, partial cover from vegetation, a large opening and protection from persistent rain. Offering several shelters gives birds more choice and reduces reliance on a single breeding site.
Practical tips for greater success with robins in the garden
A pot alone does not create a robin hotspot. The rest of the garden design also matters. A few straightforward changes can make a substantial difference:
- Less tidiness: A strip of more “wild” perennials and grasses provides both insects and cover.
- No pesticides: Chemicals reduce the available food supply and may harm young birds.
- Protection from cats: Thorny shrubs or closely branched hedges in front of the entrance make access harder for predators.
- Quiet areas: Children, dogs and frequently used paths should remain several metres away.
Anyone who has already provided a pot nesting site but notices no activity can assess it critically the following year: Is there enough cover? Are light, noise or pets causing disturbance? Sometimes moving it only a few metres within the same hedge is enough.
Useful knowledge: behaviour, risks and opportunities
Robins are loyal to a location. If a pair feels at home in a garden, it often returns year after year. A convincing breeding site can therefore have a lasting effect. At the same time, these birds react sensitively to disturbance while breeding. Anyone who succeeds should leave the terracotta pot alone and observe only from a distance.
One often overlooked issue is the risk posed by heavy rain and periods of heat. Open nests can flood during cloudbursts or overheat when heat builds up. This is precisely where the terracotta pot shows its strengths: its slight angle prevents standing water, the material buffers temperature extremes and its sheltered hedge position reduces direct sunshine.
Combined with a bird-friendly garden – offering plenty of insect food, richly structured planting and no poisons – the unassuming flowerpot can quickly become the crucial element. Anyone who has watched a pair of robins visit the improvised shelter, carry in moss and later lead out their young will see the old terracotta pot in the shed very differently.

Comments
fzdrtkfeewqertedunkkxvqrxskyrm
Leave a Comment