
A remarkably simple cardboard trick can clear the area thoroughly while improving the soil at the same time.
Anyone who has ever ended up in a tangle of brambles knows that these plants do not give up willingly. They scratch, catch on clothing and persistently reappear after being cut back. Yet an increasing number of home gardeners swear by a method that almost sounds too easy: simply lay cardboard over the ground and wait. There is rather more thought behind it than it first appears.
Why brambles return so persistently
Brambles are among the garden's classic problem plants. Their thorny canes may look manageable, but beneath the surface lies an exceptionally vigorous root system. Cutting back only the growth above ground can even help the plants, as they regrow with greater vigour.
Gardeners should be prepared for the following:
- Brambles produce long, branching root runners.
- Any piece of root left behind can produce fresh shoots.
- One summer is enough for an entire corner to become overgrown.
- Using herbicides harms soil life, insects and groundwater.
Even so, many people turn to chemicals because repeatedly digging out and cutting back the plants becomes too laborious. The cardboard method tackles precisely this frustration by exploiting a weakness of brambles: their need for light.
Brambles: a nuisance in beds, a helper in nature
As irritating as brambles can be in the home garden, they have some ecological merit. They are typical pioneer plants, quickly colonising and stabilising bare ground.
They are vital to many animals:
- Protective hedge: Dense, thorny growth provides birds and small mammals with a secure refuge.
- Food: The berries supply vitamins and energy to birds, insects and small mammals.
- Soil formation: Their roots hold the soil together and prepare it for other plants.
Brambles are useful in nature – they simply need clear boundaries in a productive garden.
For this very reason, many gardeners seek solutions that work without poisons while remaining effective. This is exactly where cardboard comes into its own.
The cardboard method: simply “starving out” brambles
The principle is astonishingly straightforward: if sunlight cannot reach the leaves, the plant can no longer produce energy. Gradually, it uses up its reserves and the root system collapses.
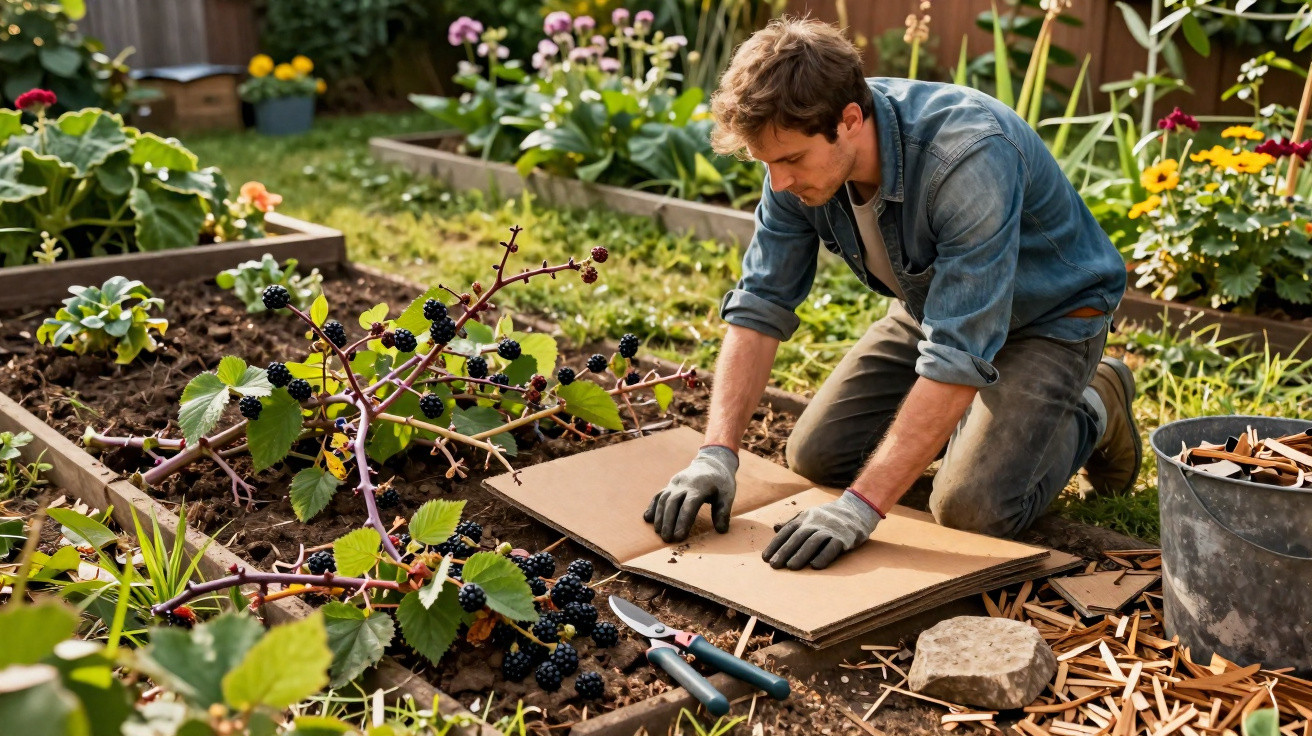
Step 1: Cut brambles back close to ground level
Start with secateurs or loppers. Cut every cane as low as possible. Gloves and sturdy clothing are essential, as the thorns show no mercy.
- Cut all shoots off just above ground level.
- Remove or shred the cut material.
- Use a saw to cut back particularly thick, old canes if necessary.
The roots must remain in the ground. At first, this may seem like only half the job, but it is part of the strategy: the cardboard takes care of the rest.
Step 2: Cover the whole area seamlessly with cardboard
Next, cover the entire bramble-infested area with cardboard. The denser the cover, the better. Every small gap that lets in light gives the plants an opportunity.
- Use only strong, untreated cardboard with no glossy coating.
- Remove tape, metal staples and plastic film beforehand.
- Lay the cardboard with generous overlaps of at least 10–20 cm.
What matters is that no ray of sunlight reaches the soil – otherwise the brambles will launch their counterattack.
Step 3: Weigh down and “dress” the cardboard
The cardboard needs weight to stop the wind carrying it away. At the same time, the area can be made more attractive.
- Secure the cardboard with stones, old bricks or wooden beams.
- Spread a thick layer of mulch, leaves, grass clippings or compost on top.
- The layer can easily be 5–10 cm deep.
This mulch layer has several benefits at once: it protects the cardboard from breaking down too quickly, retains moisture in the soil and feeds earthworms and micro-organisms.
What happens in the soil while the cardboard works
A complete transformation takes place beneath the inconspicuous layer of cardboard. The brambles rapidly lose strength while soil life gathers pace.
| Process | Effect |
|---|---|
| No light for the shoots | The plant can no longer produce energy |
| Use of root reserves | Roots gradually die off |
| Breakdown of the cardboard | Humus formation and food for soil organisms |
| Mulch layer on top | Soil remains loose, moist and fertile |
Depending on the location and the density of growth, the process takes several months. Many gardeners leave the cardboard in place for an entire growing season, from spring until autumn.
The benefits of the cardboard method at a glance
Anyone who has ever dug out a bramble root with a garden fork will appreciate the alternative. The cardboard approach offers several advantages.
- Easier on the body: No hours of digging or pulling at metres of root mass.
- Low-cost: Delivery boxes are already common in many households.
- Ecologically sound: No herbicides and no harm to soil organisms.
- Improves the soil: As it decomposes, the cardboard adds extra organic matter.
- Flexible: It can also be used for other troublesome weeds, such as ground elder or couch grass.
Rather than fighting the soil, the cardboard method works with it – turning a problem into fertile ground.
What to do after the cardboard phase
After a few months, the mulch layer can be carefully pushed aside. By then, the cardboard will usually have mostly rotted away or remain only in fragments. The ground beneath looks dark, loose and surprisingly free of roots.
Several options are then available:
- Create a vegetable bed directly.
- Plant berry bushes in orderly rows.
- Sow a wildflower meadow for insects.
- Make a seating or utility area with woodchips.
An occasional bramble shoot may still appear, particularly around the edge of the covered area. Cut or dig out these shoots immediately. Anyone who keeps an eye on the space will soon have the situation under lasting control.
Common mistakes – and how to avoid them
To make the cardboard trick work, a few pitfalls need to be avoided:
- Too thin a layer: One thin piece of cardboard is rarely enough. Several layers are better.
- Coated cardboard: Glossy or heavily printed packaging may contain harmful substances.
- Gaps around the edges: Brambles exploit every opening. The edges require particular attention.
- Impatience: Uncovering the area too early risks fresh growth.
Planning generously from the outset saves later remedial work. Overlapping edges and secure weighting are especially important.
Cardboard as a building block for sustainable gardening
This method is ideally suited to a natural, resource-conscious gardening style. Instead of continually buying new materials, existing leftovers are put to good use. Cardboard, leaves, grass clippings and compost together form a kind of “lasagne” that improves the soil over the long term.
It is also interesting to combine the approach with other strategies: planting dense ground cover once the cardboard phase is complete prevents new problem plants from becoming established. Even tough species such as wild strawberries or stonecrop help keep the area stable.
For anyone gardening with children, the cardboard project also makes a clear, practical experiment. Over several months, it is possible to watch an overgrown thorny thicket gradually become a new bed – entirely without poison, using only an everyday material that would otherwise have gone in the bin.
Comments
No comments yet. Be the first to comment!
Leave a Comment