
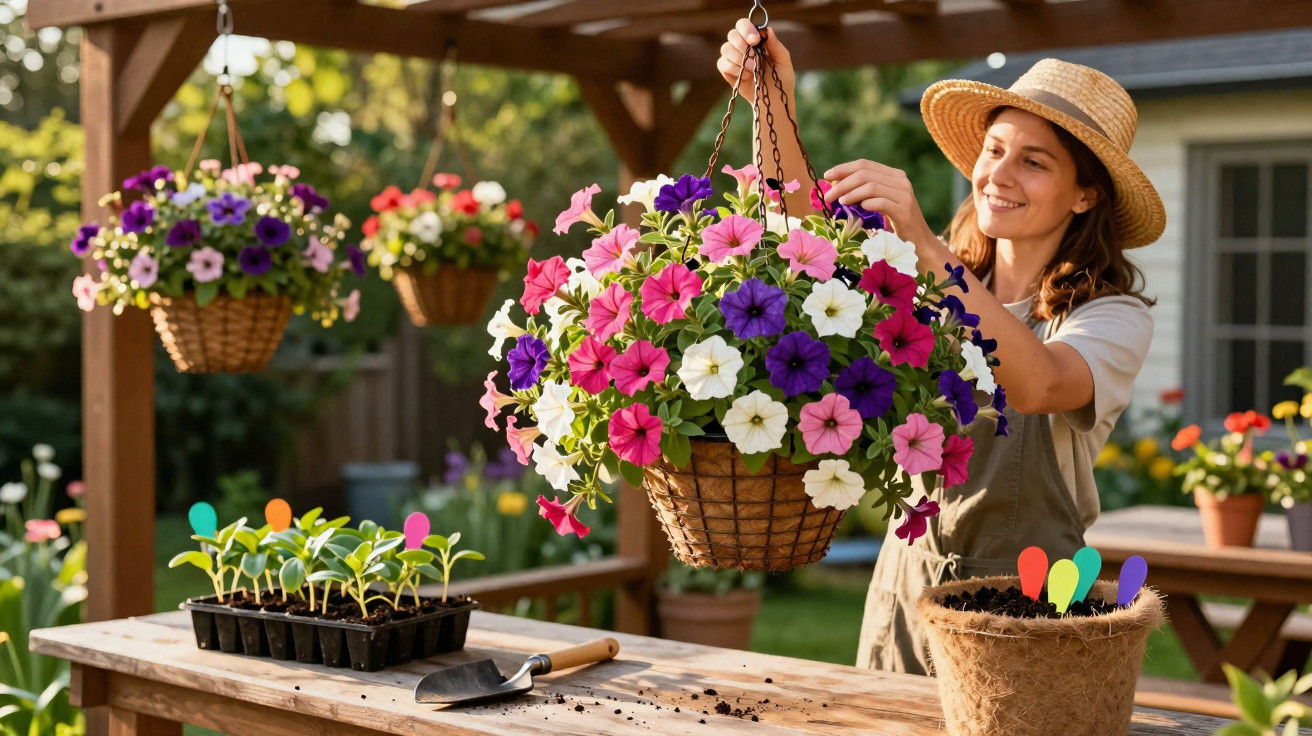
A lush cloud of flowers at eye level, with no bare patches or visible pots – many people dream of it, but few achieve it.
Anyone hanging baskets on a balcony or patio in summer hopes for a dense sphere of flowers. In reality, however, it is often three feeble plants, plenty of exposed compost and a pot rim that spoils the whole effect. A surprisingly simple 3-in-1 planting method shows how to get much better results, even without professional experience.
The 3-in-1 layout: turning a hanging basket into a ball of flowers
The principle behind this method is easy to remember: one third trailing plants, one third upright plants in the centre and one third airy filler plants between them. That is all there is to it.
“Each plant group has a distinct role: conceal, build up and connect – together, they create the effect of a dense ball of flowers.”
For a hanging basket or container measuring 30 to 40 centimetres across, the general guide is:
- 3 strong young plants in standard pot sizes, such as 9 cm pots; or
- 5 smaller young plants in mini root balls.
The secret is not to cram in as many plants as possible. Quite the opposite: excessive root mass makes the plants compete for water, causes the root ball to dry out quickly and reduces flowering. There must still be enough loose compost between the roots.
What the three plant groups actually do
1. Trailing plants around the edge
These form the “backdrop”. They spill over the sides, hide the pot and its hanger, and create a soft, rounded transition into the surrounding space. Typical choices include:
- trailing petunias
- trailing geraniums (ivy-leaved geraniums)
- verbenas with long shoots
- lobelias that cascade like a veil
- calibrachoa (mini petunias)
2. Upright plants in the centre
These give the basket height and body. Without them, the planting can look flat. Reliable options include:
- upright geraniums (zonal geraniums)
- busy Lizzies (Impatiens) for partially shaded spots
- bidens with their yellow star-shaped flowers
3. Filler plants in between
These cover gaps without making the display look heavy. They are smaller, looser-growing plants that weave between the others without taking over. The precise choice depends on the position and the colour effect you want.
The best plants for consistently full summer hanging baskets
For a hanging basket that flowers from June into autumn, many gardeners rely on annual summer flowers. They establish quickly, bloom generously and deliver exactly the “wow” effect associated with balcony displays at garden centres.
“Annual summer flowers provide maximum flower power in a small space – ideal for hanging baskets.”
One possible combination for a sunny position is:
- Edge: trailing petunias in two shades
- Centre: one sturdy upright geranium
- Filling: blue-flowering lobelia between the main plants
For partly shaded areas, busy Lizzies, fuchsias or shade-tolerant geranium varieties work well, combined with soft trailing plants such as bacopa.
Think in layers rather than varieties
If you are unsure, simply picture the finished hanging basket as three layers:
- Lower edge and sides: everything that trails over the edge and grows outwards in a droplet-like shape.
- Centre: plants that grow upwards and create the “hill” within the sphere.
- Transition: small, adaptable plants that soften the edges between the lower and upper layers.
Using this framework, it is easy to select suitable combinations at the garden centre without getting lost in variety names.
How to plant your hanging basket step by step
First, choose a suitable container. Good options include:
- wire baskets lined with coconut fibre
- woven willow baskets
- sturdy plastic hanging baskets with enough drainage holes
| Step | What to do |
|---|---|
| 1. Drainage | Place a layer of expanded clay or gravel at the bottom so excess water can drain away. |
| 2. Add compost | Fill to roughly two thirds with high-quality flowering-plant compost, then moisten it lightly. |
| 3. Water the plants | Briefly immerse the young plants in water until their root balls are thoroughly damp. |
| 4. Plant up | Put the trailing plants around the outside first, followed by the upright plants in the centre and then the filler plants. |
| 5. Water in | Water gently with a fine rose until water begins to run from the bottom. |
With coconut-lined baskets, you can carefully cut small openings into the sides of the liner. This lets you insert individual young plants sideways, placing even more emphasis on the cascading effect.
The small spacing trick when planting
Many people pack a hanging basket completely full at planting time because they want it to look finished straight away. This is precisely what causes problems in high summer. The plants then compete intensely for water and nutrients, the compost dries out more quickly, and fungal diseases can take hold easily.
“There should always be visibly loose compost between the root balls – air is not a mistake, but a reserve for growth.”
A gap of one to two finger widths between root balls is ideal. Within a few weeks, the basket will still look full, as the plants grow together and form a single visual display.
The right time: when your hanging basket can go outdoors
Summer hanging baskets planted with annual flowering plants should only stay outdoors permanently after the last night frosts. In many areas, this means from May onwards. If you would like an earlier start, you can plant the baskets in March beneath a sheltered roof or in a cool conservatory, covering them with horticultural fleece on cold nights.
A short hardening-off period is worthwhile:
- put them outside during the day for 7 to 10 days, then move them back under cover at night
- gradually increase their sun exposure so the leaves do not scorch
This helps the plants remain sturdier, and the hanging basket will cope better with later hot spells.
Care for the “wow” effect from June to September
Hanging baskets dry out far more quickly than plants in borders because their root balls are suspended and exposed to wind from every direction. During high summer, they therefore need watering very regularly.
- Water daily in summer in most cases; on hot days, brief watering in the morning and evening may be needed.
- Never leave them waterlogged: keep the compost moist, but do not allow water to sit in saucers or outer pots.
- Feed regularly: apply liquid fertiliser for flowering plants around once or twice a week.
“Anyone who feeds consistently and removes spent flowers will keep the basket younger and flowering for longer.”
Faded flower heads should be picked off regularly. This directs the plants’ energy into fresh buds rather than seed production. Some varieties, including petunias, also benefit from a light trim if they become too long and sparse in summer.
Light pruning for a perfect shape
If individual shoots become excessively long and disrupt the rounded shape, cutting them back by a third will help. The plant will branch again, fill out and look rounder overall. The basket may appear slightly thinner for a short time, but after two to three weeks the ball of flowers is usually denser than before.
Fine adjustments: position, wind and colour combinations
For lasting success, it is worth considering a few factors that are often underestimated:
- Wind: strong winds dry out a hanging basket extremely quickly and can snap delicate shoots. A slightly sheltered location noticeably extends the flowering period.
- Sun: full sun encourages flowering, but demands consistent watering. For hot south-facing balconies, choose heat-tolerant varieties.
- Colour effect: tone-on-tone combinations, such as different pink and purple shades, look elegant, while colourful mixes create more of a holiday feel.
If you hang several baskets along a balcony, you can experiment with colour gradients – for example, starting with white and pale pink by the front door, then moving towards rich red and purple at the far end. This creates a coordinated overall look rather than a wild patchwork effect.
Changing the planting with the seasons is another appealing option: in autumn, replace the summer flowers with hardy autumn plants such as small chrysanthemums, ornamental grasses and ivy. The 3-in-1 idea remains exactly the same: trailing plants, upright structure and loose filling. Once you have absorbed this framework, you can create lush hanging baskets effortlessly throughout the year.
Comments
No comments yet. Be the first to comment!
Leave a Comment