
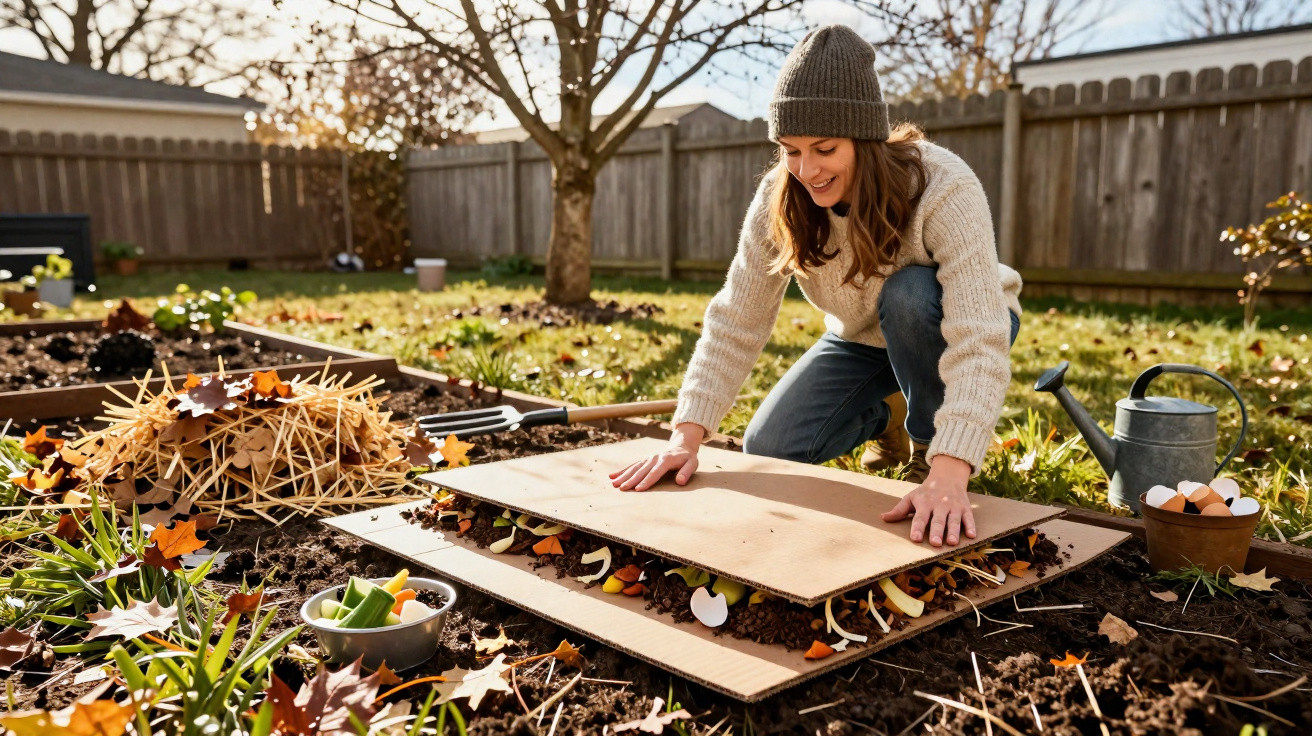
If you are thinking only of frozen beds, muddy soil and strenuous digging, you are overlooking one of the smartest ways to turn soil into a vegetable-growing paradise by spring with barely any effort: the so-called lasagne bed.
What a lasagne bed is all about
Although its name sounds culinary, it accurately describes the process: a lasagne bed is built by layering different organic materials directly on top of the existing ground. Just as with a lasagne, one layer follows another – but instead of pasta sheets, you use straw, cardboard, kitchen scraps, leaves and similar materials.
“The idea is not to feed the plants directly, but to feed the soil first – which then takes care of everything else.”
This approach is modelled on a natural system: the forest floor. Fallen leaves, twigs, dead plant matter and animal droppings accumulate there to form a deep humus layer, with no need for anyone to dig it over. A lasagne bed recreates that principle in the garden, only in a more concentrated and slightly faster form.
Why winter is the ideal time
Many amateur gardeners postpone major jobs until March or April. However, winter – especially January and February – is perfect for creating a lasagne bed, as its layers need time to decompose and settle.
- Rain and snow moisten the materials.
- Frost, thaws and soil life gradually break the layers down.
- By spring, the pile has become a loose, dark growing medium.
This makes it possible to transform even an unused patch of lawn or heavy clay soil into productive growing space within a few months – without a spade, rotavator or backache.
Starting a lasagne bed: cardboard as the secret weapon
Perhaps the most surprising stage comes first: a simple sheet of brown cardboard. Ordinary delivery boxes are ideal, provided they are uncoated, either unprinted or only lightly printed, and free from plastic film and remnants of adhesive tape.
“The cardboard blocks light, suppresses weeds and also feeds the life in the soil.”
This base layer works in several ways:
- It completely covers the existing vegetation, so grass, weeds and even persistent perennial weeds gradually lose their strength.
- The plants underneath rot down where they are, returning their nutrients to the soil.
- Cardboard consists largely of cellulose, which provides food for earthworms and micro-organisms.
Careful preparation is important:
- Remove all tape, labels and metal staples.
- Overlap the cardboard generously by at least 10–15 cm, leaving no gaps.
- Cover the entire area right up to the edges of the planned beds.
- Then water it thoroughly until the cardboard is soft and fully soaked.
Once this layer has been laid properly, the foundation of the lasagne bed is in place.
Layering materials: balancing carbon and nitrogen
Alternate “brown” and “green” materials over the wet cardboard. The principle is the same as for a compost heap: decomposition only remains reliable when carbon (C) and nitrogen (N) are present in suitable proportions.
“Brown” layers: structure and carbon
Common brown materials include:
- Autumn leaves
- Straw or hay
- Woodchip or finely shredded prunings
- Unprinted newspaper
- A small amount of sawdust, used sparingly
These materials provide carbon, keep the layers aerated and retain water. They can be applied quite generously, as they create the structural framework of the lasagne.
“Green” layers: energy and nitrogen
Green materials are moist, soft and high in nitrogen. They include, for example:
- Fruit and vegetable kitchen waste
- Coffee grounds and plastic-free tea bags
- Any remaining lawn clippings, if available
- Fresh or well-rotted farmyard manure
These ingredients give micro-organisms the energy needed to get the pile working. Without them, the materials would barely break down and would instead simply remain dry.
“As a rule of thumb, layer roughly two parts ‘brown’ material to one part ‘green’ material.”
How to build a lasagne bed step by step
Once you have followed the process once, its logic becomes clear. One possible method is:
- Lay out the cardboard and water it thoroughly.
- Add a coarse, airy base layer of twigs or straw.
- Scatter a thin green layer, such as kitchen waste or manure.
- Cover it with a substantial brown layer of leaves, hay or paper.
- Repeat steps 3 and 4 until the bed reaches a height of 30–50 cm.
- Finish with a mostly brown layer and, if desired, spread a little garden soil or old potting compost over the top.
Each layer creates a kind of miniature composting system directly in the bed. Over the following weeks, the materials will sink noticeably – a positive sign that activity is taking place inside.
How household waste becomes garden gold
Creating a lasagne bed effectively gives you a small on-site disposal system for organic waste, but with a beneficial outcome. Rather than sending so much to the food-waste bin or taking it to the recycling centre, you can place it straight into the bed.
Suitable materials include:
- Vegetable peelings and fruit scraps, with citrus fruit used only in moderation
- Dried-out houseplants, removed from their pots
- Old potting compost from planters and pots
- Faded perennial growth cut back in autumn
The benefit is not limited to producing less waste and making fewer trips. Nutrients stay within your own garden cycle. Winter then becomes a collection period for materials that plants will gratefully take up in summer.
The invisible soil army does the work
After the bed has been assembled and watered thoroughly once more, it may appear that nothing is happening – yet a great deal is underway. Earthworms, woodlice, springtails, fungi and bacteria move in and begin their work.
“The lasagne bed becomes a living bioreactor that works around the clock.”
Earthworms tunnel through the layers, pull material downwards and combine it with the original soil. Their castings form crumbly, nutrient-rich aggregates that retain water while keeping air in the ground. Micro-organisms break down even tough remnants into the finest humus.
Slow decomposition produces a small amount of heat. Some activity therefore continues within the bed even in cold weather. As a result, the soil beneath it warms more quickly in spring, and its biological clock starts earlier.
Spring planting without digging or frustration
By April or May, the reward for the winter work becomes apparent. The once-tall layers will have settled considerably, while the contents look dark, loose and pleasantly earthy in smell. Some individual materials may still be visible, but they do not cause a problem.
Planting is remarkably straightforward:
- For larger young plants, make a hole using your hand or a small trowel.
- If you wish, add a handful of fine planting compost to the hole.
- Place the plant in position, firm the material lightly around it and you are done.
Because the ground has not been compacted or turned over, both its structure and soil life remain intact. Weed pressure is low, as many seeds have had no chance to grow beneath the cardboard and layers. Watering is often needed less frequently too, because the material holds moisture like a sponge without becoming waterlogged.
Who benefits most from a lasagne bed
This method is particularly suitable for people who:
- have heavy, compacted soil that is difficult to cultivate;
- want to turn an area of lawn into a vegetable bed;
- have back problems or simply dislike digging;
- want to make practical use of large amounts of organic waste from the kitchen and garden.
The risks are limited if you keep a few points in mind. Too much fresh green material can rot and develop an unpleasant smell; extra brown layers will help prevent this. Heavily printed or coated cardboard, plastic labels and glossy colour leaflets do not belong in the bed.
Practical everyday tips and variations
If you do not have much material available at once, you can construct the bed gradually. Add a fresh layer of kitchen scraps and brown material each week as it becomes available. In this way, the lasagne builds up slowly alongside everyday life.
Raised beds can be filled using the same approach: coarse wood at the bottom, then cardboard, followed by alternating brown and green layers, with a layer of good soil on top. The result is similar – loose, warm, nutrient-rich soil that continues to supply nutrients for years.
Many gardeners later combine their lasagne bed with permanent mulch. After planting, simply cover any bare areas with leaves, straw or grass clippings. This protects the newly created soil structure, reduces drying out and continually provides fresh food.
Anyone who has experienced the process soon realises that a lasagne bed is less a “technique” than a change in mindset. It means moving away from digging and hauling, and towards layering and observing. Earthworms, bacteria and fungi do the main work – you simply need to let them.
Comments
No comments yet. Be the first to comment!
Leave a Comment