
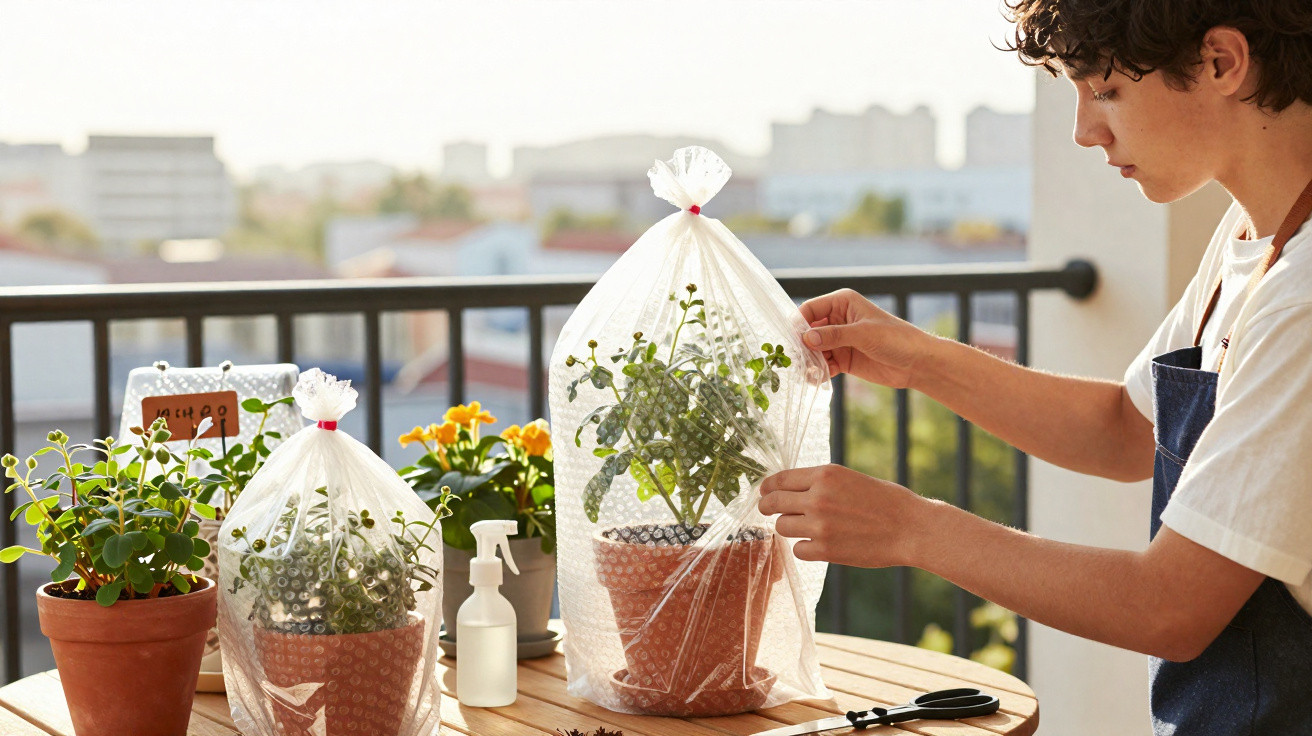
Using bubble wrap for plants has become an increasingly popular, straightforward way to protect pots and make a small greenhouse at home. During spells of severe cold or excessive heat, this home-made solution can keep plants in more stable conditions, limiting losses from drying out, scorching or frost while supporting the growth of species grown in pots.
What is a bubble-wrap greenhouse for plants?
A so-called “bubble-wrap greenhouse” consists of protection placed around a pot and, in some cases, over the growing medium, creating a more consistent microclimate. This enclosed space limits moisture loss, shields plants from cold winds and moderates the effects of direct sunshine, which is particularly helpful in areas with harsh winters or sharp temperature changes.
In urban settings, including balconies and terraces, bubble wrap can also insulate pots from very hot ceramic or concrete surfaces. The air trapped inside its bubbles creates a thermal cushion, reducing the transfer of heat or cold into the container and protecting roots against sudden temperature changes.
How to use bubble wrap on pots step by step
When making a home greenhouse with bubble wrap, it is important to follow a few basic steps and tailor the method to the pot size and plant type. This provides thermal protection without smothering the root system or restricting airflow around the plant.
The following steps explain how to fit bubble wrap to pots simply and effectively:
- Measure the pot: Measure the container’s circumference and height to determine the amount of plastic required, preventing unnecessary excess and waste.
- Cut the bubble wrap: Cut a strip long enough to wrap around the pot once or twice, keeping the top open for the plant.
- Wrap the container: Place the bubble wrap around the pot, with the bubbles facing either inwards or outwards, while retaining the insulating air layer.
- Secure it: Fasten the material with string, durable adhesive tape or clips, without pulling it too tightly and risking damage to the pot or growing medium.
- Cover the soil: Cut a bubble-wrap circle slightly smaller than the pot diameter and lay it over the soil surface, leaving a gap around the stem.
It is important not to allow the plastic to touch leaves directly in places with strong sunshine, as it may create a lens effect and cause scorching. Where sunlight is intense, focus the protection around the pot and over the growing medium, leaving the foliage completely uncovered.
What precautions matter when using bubble wrap for plants?
A few simple precautions make the home greenhouse more effective and help prevent issues such as fungal growth and excessive humidity. Proper ventilation is essential, especially on warm or damp days, so it can be helpful to partly open the covering during milder parts of the day.
To regulate the microclimate and keep plants healthy, check the following points regularly:
- Pot temperature: Touch the container to assess whether it is becoming too hot or cold, then alter the amount of plastic if needed.
- Contact with above-ground growth: Keep the plastic away from leaves and flowers to lower the risk of scorching and trapped humidity.
- Growing-medium moisture: Monitor the soil, as evaporation is reduced and watering may be needed less often.
- Visual inspection: Look for mould, fungi or yellowing leaves to identify whether the microclimate needs adjusting.
What are the benefits of bubble wrap in summer and winter?
Bubble wrap’s main advantage is its thermal insulation, which works differently according to the season. In summer, it can help roots stay cooler, soften temperature fluctuations and reduce water evaporation, potentially reducing water stress and the need for frequent watering.
During winter, the added protection helps shield the root system from frost, retain some of the heat built up during the day and lessen exposure to cold winds. When used carefully and checked regularly, a bubble-wrap greenhouse can be a practical option for people growing sensitive species on balconies, terraces and in small gardens throughout the year.
Comments
No comments yet. Be the first to comment!
Leave a Comment