
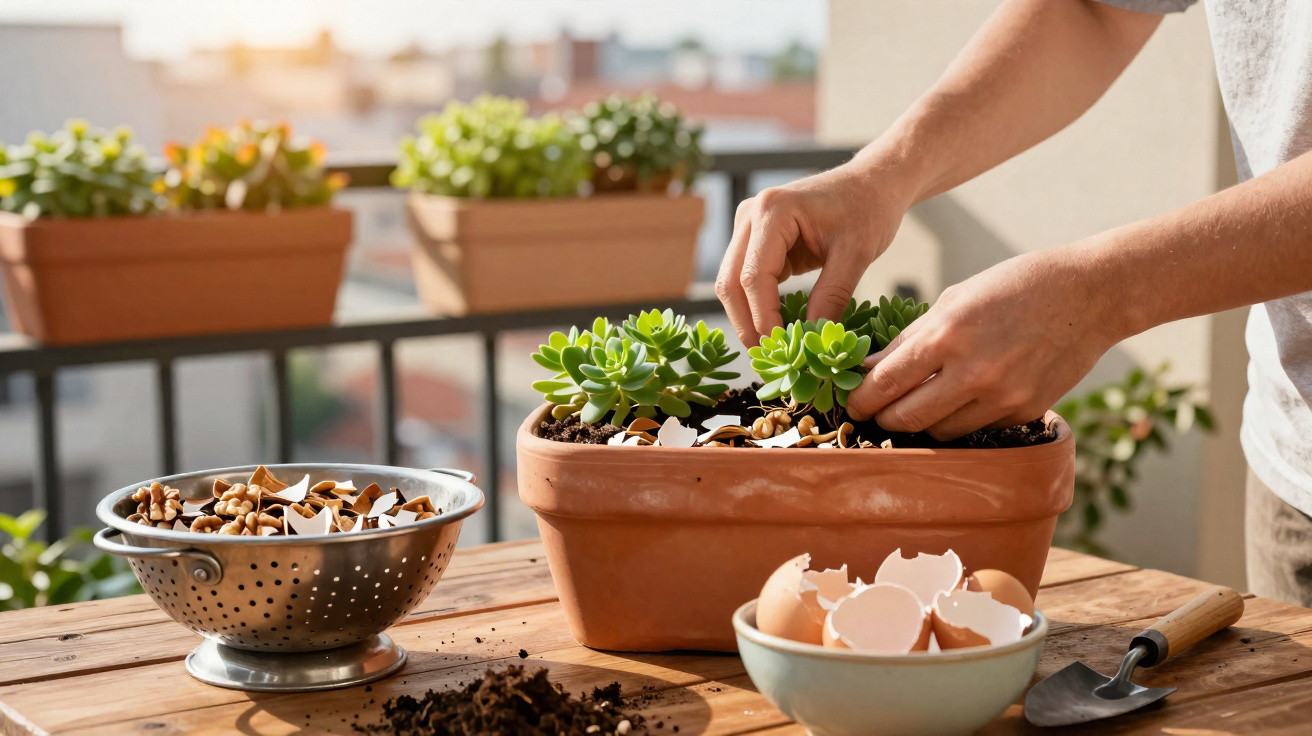
The answer starts right at the bottom of the pot.
Anyone planting stonecrop, biting stonecrop or other Sedum varieties generally expects a hardy, almost indestructible plant. Yet after several rainy days, the pot can still fail: leaves turn soft and mushy while the roots rot. The real problem is rarely the visible part of the plant; it is usually found at the base of the planting hole. This is where it is decided whether water can drain away freely or becomes a fatal trap.
Why Sedum can suddenly die despite being hardy
Sedum thrives in sunshine, heat and poor soil. Most varieties also cope well with cold weather. What they cannot tolerate at all, however, is water sitting around their roots. This can happen more quickly than many people expect in window boxes, containers and even garden beds.
Each time the plants are watered, the compost settles a little further. Over time, the growing medium becomes compacted and its small air spaces disappear. Eventually, water can no longer pass through properly and instead collects at the bottom. A concealed ‘water tray’ develops there, effectively drowning the roots.
“Anyone who wants to keep Sedum healthy should think less about fertiliser – and much more about how excess watering water can escape.”
Gardeners traditionally turn to expanded clay or gravel in these situations. Both work, but they have two drawbacks: they cost money and make pots heavier. This soon becomes impractical on balconies and windowsills.
The surprising kitchen material that replaces expanded clay for Sedum
Rather than carrying home bags of gravel, look in the kitchen. A waste material produced there is highly suitable for Sedum drainage and would otherwise be thrown away.
The following materials are particularly suitable:
- walnut shells
- hazelnut shells
- almond shells
- shells from unsalted pistachios
- crushed cherry or plum stones
- eggshells broken into coarse pieces
Placed in the planting hole or container, these materials create a loose, coarse layer that lets water pass through without compacting. The shells break down very slowly and generally last for two to three years before crumbling completely.
The right depth for the drainage layer
For Sedum, a layer around 3 to 5 cm deep at the base of the planting hole or pot is sufficient. It acts as a buffer between water and the roots. Whether using a large container or a small window box, the depth should stay within this range; even distribution matters most.
Step by step: making drainage with nut shells and eggshells
Preparation is quick and requires no specialist tools. A sturdy fabric bag or old hessian sack is enough.
- Collect kitchen waste: Keep nut shells, stones and eggshells separately, allowing them to dry thoroughly.
- Put everything in a bag: Place all the materials together in a fabric bag or an old pillowcase.
- Crush them coarsely: Hit the bag firmly a few times with a hammer until it contains chunky pieces. Do not make powder; the fragments need to remain clearly noticeable.
- Spread it across the base of the pot: Add an even layer 3 to 5 cm deep over the entire bottom surface.
- Add a thin sandy layer: Cover it with sandy soil or a highly free-draining growing medium.
- Plant the Sedum: Only then position the plant, fill any gaps with growing medium and press down lightly.
With eggshells in particular, it is worth leaving the pieces slightly larger. Fragments measuring 1 to 2 cm retain their curved form and create extra gaps through which water can drain especially quickly.
Why kitchen-waste drainage works so well
Nut shells, stones and eggshells are firm and retain their shape. Their irregular forms create larger air passages between the pieces, known as macropores. Water drains quickly through these channels, while the soil above does not settle as heavily.
Instead of forming a dense, wet layer, the base of the pot remains airy. This keeps Sedum roots sufficiently dry, while also supplying oxygen and allowing them to anchor themselves securely.
“Kitchen-waste drainage not only prevents waterlogging; it also keeps the growing medium loose and breathable for years.”
The material also gradually releases a small amount of organic matter without substantially altering the soil. This does not give plants a sudden nutrient boost, which would not be desirable for Sedum anyway. Its fleshy leaves perform better in lean, free-draining soil than in heavily fertilised potting compost.
Balconies and windowsills: light, affordable and easier on the back
This method is particularly appealing for city dwellers without a car. Instead of hauling heavy bags of gravel or expanded clay from a DIY shop, a few weeks of normal kitchen habits will provide the materials needed. Anyone who eats nuts or regularly uses eggs will automatically produce enough for several containers.
The pots remain noticeably lighter, reducing the load on railings, shelves and windowsills. This is especially useful in older buildings or on narrow balconies, where there is less risk of the weight becoming excessive.
Is expanded clay still needed for Sedum?
Expanded clay pellets and gravel still have an established place in gardening and can of course continue to be used. For Sedum in pots and smaller containers, though, kitchen-waste drainage is usually entirely sufficient when it is installed properly.
Three basic rules determine whether it works:
- Use only unsalted shells and stones.
- Do not crush the material too finely; coarse pieces create more air space.
- Always add a layer of very sandy, free-draining soil above it.
The aim is not to fertilise the plants, but to create a stable base that allows water to drain rapidly downwards. Anyone repotting or replanting every two to three years can simply renew the layer with kitchen scraps collected in the meantime.
Locations where this Sedum trick is especially useful
It is most worthwhile in places where waterlogging is a particular risk:
| Location | Benefit of kitchen-waste drainage |
|---|---|
| Window box | Keeps the weight low, improves drainage and reduces root rot |
| Windowsill planter | Lightweight containers, no need to carry gravel, Sedum stays compact |
| Container on a roof terrace | Provides drainage during heavy rain and lowers the risk of waterlogging on concrete surfaces |
| Lightweight beds with shallow soil | Improves water run-off even where the soil layer is thin |
How often the drainage should be renewed
How long the layer lasts depends on the size of the pieces and the material used. Nut shells usually remain intact longer than eggshells alone. On average, the effect remains clearly noticeable for two to three years. After that, the fragments have broken down enough for the air channels to become significantly smaller.
Those who refresh their Sedum planting every few years can empty the pots completely, add fresh kitchen waste and replant. In permanent beds, it is often enough to work in another layer of shells when plants are next divided or newly planted.
Meeting Sedum’s general needs
Alongside drainage, several other factors help Sedum remain healthy over the long term:
- Choose a position that is as sunny as possible, ideally in full sun.
- Keep the growing medium fairly sandy and lean, with little organic content.
- Water only moderately; it is better to be too dry than too wet.
- Avoid nitrogen-rich general fertilisers, otherwise shoots become soft and flop over.
Anyone following these points will have a plant that readily withstands heatwaves, dry spells and even moderate cold. Particularly during long periods without rain, many gardeners use Sedum to green roofs, wall tops or rock beds without constantly reaching for the watering can.
Risks and limits of kitchen-waste drainage
Despite its many advantages, there are several points to bear in mind. Salted pistachio or peanut shells must never go into the pot. Salt damages roots and can quickly cause leaf discolouration and growth problems, particularly in smaller containers.
If the material is made too fine, for example by grinding it heavily, the drainage benefit is lost. The fragments then mix with the soil, clog the pores and ultimately leave the growing medium behaving much as it would without an additional layer. A few firm, clearly felt blows with a hammer are better.
In areas where plants are very sensitive to lime, eggshells should not be used directly around demanding species. Sedum generally has no problem with a little extra calcium in the soil, but this method would be unsuitable for bog plants or azaleas.
Practical example: from kitchen waste to a green balcony oasis
Anyone moving into a flat without a garden can collect material gradually over several weeks: crack nuts, dry eggshells, save stones and keep everything in one container. By the time the Sedum plants are ready to move in, there will be enough drainage material available.
Once used, the watering issue becomes much less severe. Rain or a slightly overenthusiastic use of the watering can will no longer immediately put the plants at risk. This is particularly reassuring for beginners worried about losing supposedly ‘easy-care’ succulents through incorrect watering.
An inconspicuous kitchen waste product is thus turned into a clever tool for stable, long-lasting Sedum planting – without a trip to the DIY shop and without adding unnecessary weight to a balcony or windowsill.
Comments
No comments yet. Be the first to comment!
Leave a Comment