
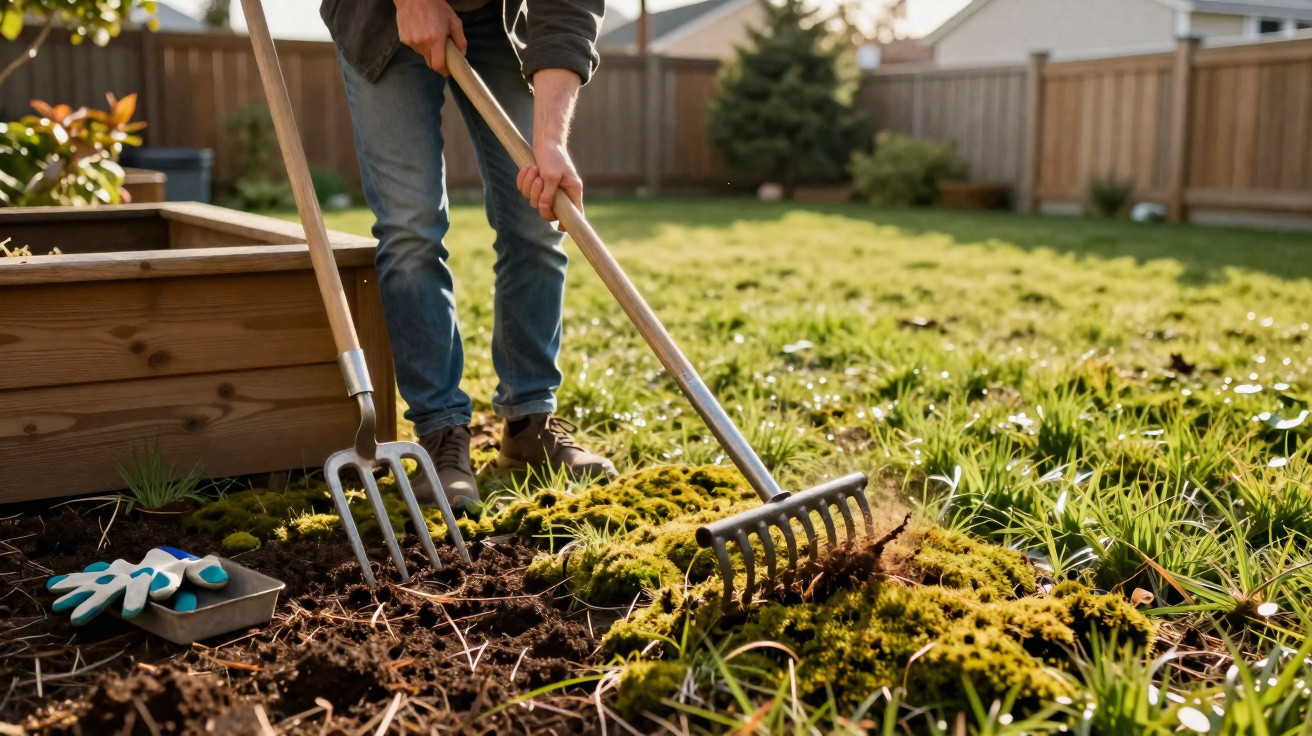
The first instinct is often to hire expensive equipment, buy harsh chemicals or search online for “miracle cures”. Yet a straightforward routine using two traditional hand tools is enough to help the lawn recover naturally, becoming dense, resilient and free from a carpet of moss.
Why moss suddenly spreads through the lawn in spring
Moss does not simply appear “out of nowhere”. It takes over gaps where the lawn has become weak. Common causes include:
- compacted soil that prevents water from draining properly
- persistently damp areas, such as shaded north-facing sides
- mowing the grass extremely short
- acidic soil with a low pH level
- permanent shade beneath trees or hedges
These are exactly the conditions moss favours. It reproduces through spores and can quickly create a continuous layer wherever grass is barely able to grow. Specialists regard the period from late winter into early spring as the best time to take action. As the lawn begins growing again, it can rapidly reclaim bare patches.
“Anyone who merely removes moss without tackling its causes will see the same result next spring – only slightly worse.”
Temperature is another crucial factor. While the soil remains very cold and nights are frosty, grass responds slowly. Major interventions, such as deep cultivation or aggressive treatments, achieve little at this point. More intensive work becomes worthwhile only once temperatures have settled consistently above freezing.
The two tools needed for a lawn with less moss
Rather than using a powered scarifier and a full kit from the DIY shop, two hand tools are essentially all that is needed. They are inexpensive, last for many years and can be used accurately even on smaller lawns.
1. Lawn rake or scarifying rake: combing out moss and thatch
The first useful tool is a lawn rake or scarifying rake. It resembles a more aggressive version of an ordinary rake and usually has sharp, curved metal tines. Its job is to:
- pull moss out of the lawn surface
- clear away old grass cuttings and thatch
- lightly score the top layer of soil
Anyone who rakes over the lawn in spring is often surprised by how much material comes out. At first, the result can look severe: the lawn suddenly appears patchy. However, this is precisely what starts the renewal process. Grass roots gain access to air, light and room to grow again.
“One thorough pass with the rake in spring can give the lawn a decisive boost for the rest of the year.”
2. Lawn aerator or garden fork: relieving compaction
The second tool addresses what is barely visible from the surface: soil structure. Suitable options include:
- a digging fork with sturdy tines
- a manual lawn aerator with hollow tines or solid spikes
- a spiked lawn roller for larger areas
Use the tool to pierce the soil at regular intervals. These holes help water soak in more effectively, give roots additional oxygen and gradually allow compacted ground to recover. This makes a noticeable difference on heavily used lawns and in clay soils in particular.
The best order: when to carry out each lawn-care step
A structured approach gets considerably more from both tools. A simple routine that works well in practice could look like this:
- Do not mow the lawn too short. Before undertaking larger jobs, cut it to around five to six centimetres, but no lower.
- Remove moss and thatch with the lawn rake. Work in two directions, across and lengthways, then clear all loosened material from the grass.
- Optionally apply an iron-based product. Many amateur gardeners use lawn fertiliser containing a moss treatment, which blackens plant residue while also strengthening the grass.
- Rake lightly once more after one to two weeks. By then, the fertiliser will have taken effect and dead moss will be easier to remove.
- Make holes at regular intervals with a fork or aerator. Focus especially on problem areas beneath trees, on slopes or beside well-used paths.
- Overseed bare patches. Fill holes and thin areas with suitable lawn seed, press it down gently and water it.
- From then on, maintain the lawn consistently. Avoid drastic mowing; instead, mow more frequently and adjust watering to suit the soil.
Starting these steps in spring and repeating them gently in autumn changes the balance: grass becomes dominant, while moss loses the conditions it prefers.
How much “chemistry” is useful – and where care is needed
Shops sell many products designed to blacken moss while feeding the lawn at the same time. Their effect is usually based on iron compounds combined with nitrogen. Such products can support work with the rake and aerator, but they cannot replace mechanical treatment.
“Without air in the soil and light reaching the grass blades, even the best fertiliser will not turn a mossy lawn into a sports pitch.”
Checking the label is important: traditional iron-containing lawn fertilisers are generally authorised for private gardens, whereas synthetic pesticides are restricted in many settings. Wear protective gloves, never exceed the stated application rate, and keep children and pets away for as long as the manufacturer advises.
Common mistakes that practically invite moss
Many of the underlying causes can be prevented by changing a few habits. The most frequent issues are:
- Lawn cut too short: Regularly trimming grass to carpet height weakens both blades and roots.
- Constant shade: Under dense trees, a shade-tolerant seed mix or even different planting is often more appropriate than a purely ornamental lawn.
- Permanently wet soil: Waterlogging, for example in dips in the ground, strongly encourages moss. Drainage or a slight adjustment to the ground level does more good than any bag of fertiliser.
- Incorrect liming: Applying lime simply “as a precaution” can shift the pH level in the wrong direction. Test first, then act.
Correcting these mistakes creates the conditions in which the two hand tools can deliver lasting results at all.
How to understand your own lawn soil better
A simple soil test from a garden centre can reveal whether the pH level is suitable. Ornamental lawns perform best in soil that is slightly acidic to neutral. If the ground is clearly too acidic, lime may help. Where it is already within a good range, lime offers little benefit and may even cause further problems.
Digging a spade into the ground also provides useful clues. Crumbly soil containing plenty of fine roots indicates favourable conditions. Sticky, smeared clumps or very hard lumps point to compaction; this is where using a fork, aerator and, where possible, regularly worked-in compost is worthwhile.
Everyday lawn care: small tasks, major results
Two tools can achieve a great deal, but routine care determines how long those results last. Several simple habits make a clear difference:
- Mow more often at a higher setting rather than infrequently and extremely low.
- Water only when the soil is genuinely dry, but water deeply when you do.
- Do not leave autumn leaves on the lawn, as a bed of moss can quickly form beneath them.
- Move play equipment or a trampoline occasionally, so that individual spots are not compacted continuously.
Over time, it becomes clear that lawns are remarkably resilient when conditions are right. Combining a rake with an aerator brings air to the roots and removes moss’s advantages. With targeted overseeding and suitable fertilising, a patchy lawn gradually develops into a hard-wearing green surface that copes far better with rain, children’s feet and summer heat.




Comments
No comments yet. Be the first to comment!
Leave a Comment