
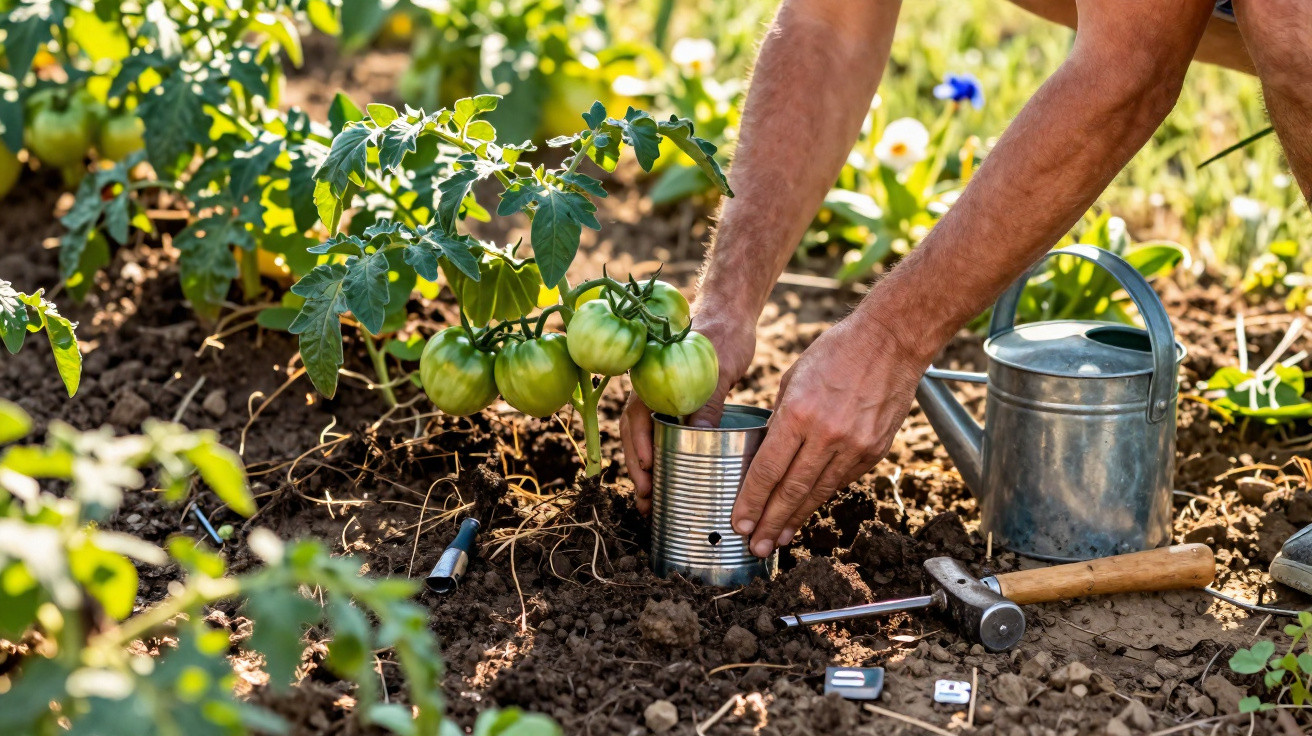
Between shrivelled tomatoes, drooping leaves and rising water bills, watering in the height of summer can feel like a battle that cannot be won. Yet, during the winter break, when irrigation seemed a distant concern, an idea emerged that is as straightforward as it is clever: a fully functional watering system made from an ordinary tin can. No electronics, no plastic hose and no marathon trip to the DIY shop.
Summer heat, thirsty beds and the constant watering question
Recent years have made one thing clear: heatwaves are lasting longer, soil dries out more quickly, and even hardy plants are pushed to their limits. Anyone with a garden, balcony or simply a few containers on the patio will know the situation: spend a weekend away and the basil has collapsed, cucumbers are hanging limp, and the lettuce looks like paper.
The instinctive response is obvious: water more. However, much of that water ends up where it serves no purpose – on the surface, in cracks or across sun-warmed paving. The roots often receive surprisingly little of it.
Why conventional watering so often fails
Watering cans, hoses and sprinklers share the same weakness: water arrives quickly, in large quantities and usually at the wrong moment. Common consequences include:
- Water runs across the surface instead of soaking deeply into the ground.
- Roots can remain remarkably dry despite wet-looking soil.
- Evaporation takes a sizeable share of this valuable water.
- It is easy to misjudge the amount: the result is either waterlogged soil or dust.
Container plants and raised beds are particularly sensitive. One hot, windy day can be enough for their compost to dry out entirely within a few hours.
The surprising discovery: the tin can that was allowed to stay
The turning point did not happen in the garden, but in the kitchen. After a meal, an empty can normally ends up in the sink, is quickly rinsed out and then placed in the recycling – a familiar routine. This time, though, it caught the eye for a little longer.
It is, in fact, almost perfectly designed for the job: sturdy, rust-resistant, watertight and able to hold its shape. Nevertheless, it is usually thrown away immediately.
From disposable packaging to a garden tool
Once degreased, washed and stripped of its label, all that remains is a simple metal cylinder. There are no electronics, moving parts or unnecessary extras. That is exactly what makes it appealing. The idea suddenly becomes clear: if the can can hold water, it can probably release it gradually too. Not into the air above the soil, but below ground, directly around the roots.
“A piece of kitchen waste becomes a small water reservoir that works for hours precisely where the plant needs it.”
What you actually need
The assembly could hardly be simpler. A working mini irrigation system requires only:
- 1 empty tin can (approximately 400–800 g contents)
- 1 hammer
- 1 nail or sturdy pointed tool
- Gloves to prevent cuts
No other materials are necessary. There is no need for electricity, a pump or a timer.
Turning a tin can into an automatic water dispenser
The entire trick lies in the base of the can. This is what determines whether the plant is drowned or gets through the heat comfortably.
The crucial step: holes in the base of the can
Use the nail to make five to ten small holes in the bottom of the can. The key point is to make several tiny openings rather than a few large ones. Small holes create a slow, continuous drip, whereas large ones allow the water to escape in a rush.
The water flow can be adjusted roughly as follows:
- Very small holes: slow flow, ideal during prolonged heat.
- Medium-sized holes: standard flow for most beds.
- A few larger holes: for thirsty plants in loose soil.
If desired, fill the can on the patio as a test to see how long it takes to empty. This provides a useful sense of whether any adjustments are needed.
The best position: close to the roots, but not against them
Next comes the most important stage in the bed: positioning. Digging a hole roughly a hand’s width away from the plant is usually sufficient. Bury the tin can upright with its pierced base facing downwards. Only the top rim should remain visible.
“The can works like an underground water channel: fill it from above, and it releases water gently below – right in the root zone.”
Then simply fill it with water. The rest happens automatically: the drier the soil, the faster it absorbs the water. This creates a reasonably natural rhythm.
What happens after a few days in the bed
At first, the arrangement can look rather unusual in the garden: can rims sticking out of the ground as though someone has buried their store cupboard. After several days, however, the results that matter begin to show.
Plants cope noticeably more calmly with heat
Leaves are slower to droop. Flowers last longer. Tomatoes and peppers are less prone to splitting. The soil around the plant may feel dry at the surface, while the root zone directly beside it remains well supplied. Adding mulch – covering the soil with straw, grass clippings or leaves – noticeably enhances the effect.
More stable growth quickly becomes apparent particularly with:
- Tomatoes in open ground or raised beds
- Cucumbers and courgettes
- Berry bushes
- Thirsty container plants on balconies and patios
There is another benefit: leaves stay dry while watering, so fungal diseases spread much more slowly.
Less pressure on you and your water meter
Once filled, a larger can will often last two to three days in summer, depending on the soil, hole size and plant. Anyone taking a short break away or lacking time for daily watering gains valuable flexibility. Rather than rushing through every plant each evening, it is enough to supply selected plants through these hidden water reservoirs.
Water use falls because none is needlessly evaporating or running away. Every refill goes straight to the place where it is genuinely needed.
Less waste, less plastic, less wastage
Beyond its practical purpose, this approach has another rather appealing advantage: it saves resources, not only water but materials as well.
Upcycling instead of buying new equipment at the garden centre
Rather than buying expensive drip hoses, plastic cones or complicated timer-controlled systems, something that is already available can go into the garden. The can that would otherwise be recycled extends its useful life by a few seasons.
“Every reused can replaces a new piece of plastic – and makes the garden a little more self-sufficient.”
Anyone who regularly uses ready meals, passata or tinned beans already has the material at home. Neighbours and friends are often happy to collect cans too once they know what they will be used for.
The everyday balance: a small change with a major effect
Many gardeners report three noticeable outcomes:
- Significantly lower water consumption per bed.
- Less work during hot spells.
- Greater peace of mind when a watering session is missed.
There is also an element of fun: experimenting with can heights, hole sizes and spacing reveals just how differently various plants respond.
What to know before getting started
Although the principle is simple, several points are worth keeping in mind:
- Smooth sharp can edges with a file or bend them over.
- Avoid cans with badly damaged coatings if the soil is very acidic.
- Check the cans in autumn and replace them if necessary.
- In very heavy soil (clay), use fewer but slightly larger holes.
There is one further consideration: metals can corrode over time. In a home garden, this is generally unproblematic because the quantities involved remain very small. Anyone particularly concerned about this should use the method in vegetable beds that are cultivated annually rather than directly beside sensitive perennials.
Other everyday items suitable for irrigation
The tin can is only one example of how household leftovers can prove useful in the garden. Other options include:
- Thick-walled glass bottles placed upside down in terracotta watering cones.
- Old plastic bottles with tiny holes in their sides, buried beside hedges.
- Unglazed ceramic pots used as water reservoirs in a bed.
Every version follows the same basic principle: release water slowly and accurately instead of pouring it out all at once.
Why winter is the ideal time for this idea
In summer, there is often no time to try something new. Watering, harvesting and pruning take priority. Winter provides the calm needed to prepare projects like this. Cans can be collected and cleaned, holes made and locations in the beds planned well in advance.
Anyone who builds a small supply of prepared cans now can begin the growing season more relaxed in spring. As soon as tomatoes, squashes or perennials are planted, the water reservoirs will already be waiting.
“You do not need to be a technology enthusiast to use an ‘automatic’ irrigation system – sometimes a hammer and an empty can are enough.”
This simple solution brings a goal that many home gardeners have pursued for years within reach: less effort, less waste and healthier plants that can withstand even hot summers. Best of all, the ingredients would otherwise simply be thrown away.

Comments
No comments yet. Be the first to comment!
Leave a Comment