
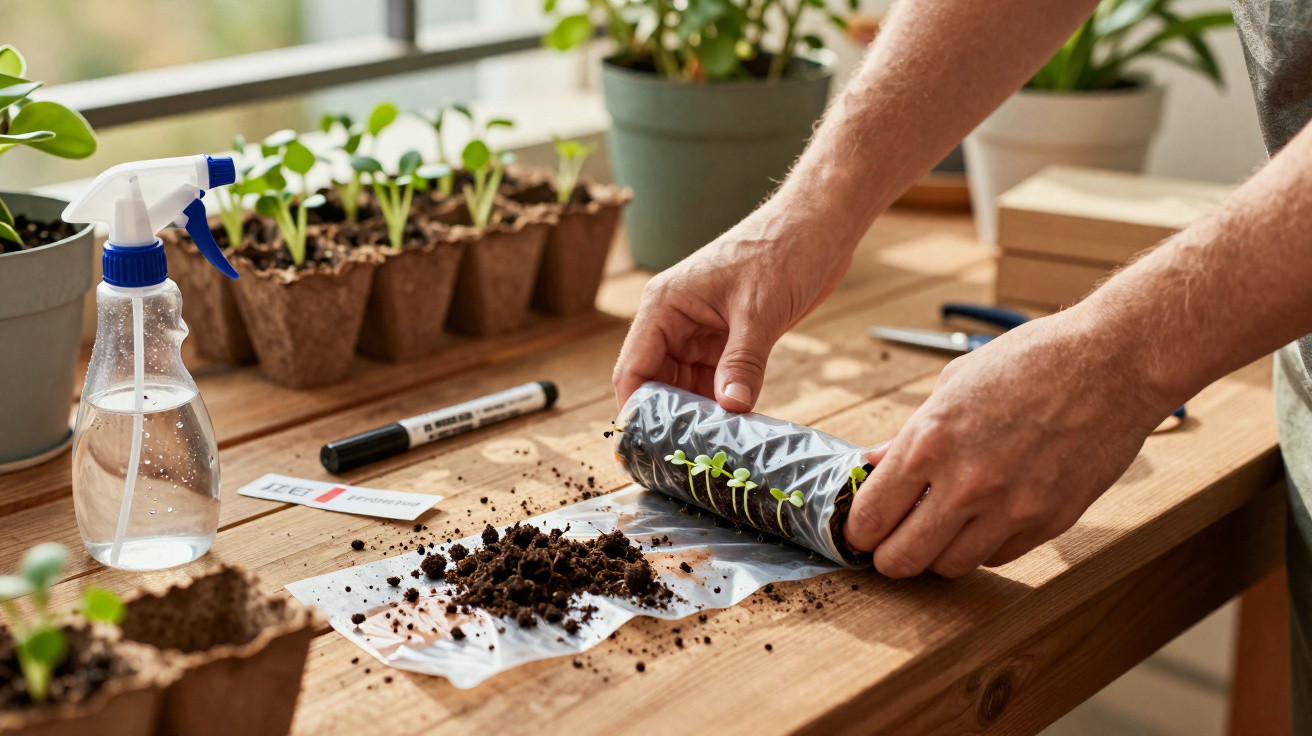
Rather than filling shelves with plastic trays and purchasing fresh pots every season, more gardeners are using a rolled “snail” made from recycled materials to raise dozens of seedlings in very little room.
The everyday object replacing seedling pots
This is not a clever new piece of equipment. It uses something many of us discard without thinking twice: used plastic bags or sheets of newspaper.
These pliable materials are used by gardeners to make a “snail sowing” or “seed roll”. The principle is straightforward: a flat strip of plastic or paper is lined with an absorbent layer and seed compost, then rolled into a neat coil containing seeds.
By rolling their seeds into a compact spiral, gardeners can raise an entire tray’s worth of seedlings using the footprint of a mug.
The technique is increasingly appearing on gardening blogs, forums and social media, especially among those aiming to reduce plastic pot use, spend less money or grow seedlings where space is tight.
What is the “snail” sowing method?
The snail method starts seeds in a spiral roll rather than in separate pots or conventional seed trays.
At its heart, the process is simple: take a long flexible strip, add a layer that retains moisture, spread on a fine layer of seed compost, arrange the seeds and roll everything into a coil.
The finished roll looks like a cinnamon bun of compost and seeds, standing upright in a shallow dish with a little water at the bottom.
Why gardeners are adopting this trick
A number of useful benefits explain the rapid spread of this technique.
- Space saving: One snail roll can accommodate dozens of seedlings while taking up no more room than a saucer.
- Low cost: It mostly uses materials already found at home, including supermarket bags, empty compost bags and newspaper.
- Less plastic waste: Soft plastics that might otherwise be put in the bin can be reused by gardeners.
- Easy transplanting: Once seedlings are ready, unrolling the coil gives access to each plant with little disturbance to its roots.
The space-saving advantage is especially attractive for balcony gardeners, students and people renting small flats. Four or five rolls can fit on a bright windowsill, each producing a modest crop of salad leaves, herbs or flowers.
What you need to make a seed “snail”
The materials are basic, although choosing the right combination makes the process run more easily.
| Item | Role in the method |
|---|---|
| Plastic bag or newspaper strip | Outer support that keeps the roll intact |
| Kitchen towel or thin fabric | Absorbent layer that maintains even moisture |
| Fine seed compost | Growing medium used for germination |
| Seeds | Vegetables, herbs, flowers – anything small-seeded |
| Shallow dish or saucer | Base that keeps the roll upright and contains a little water |
Many gardeners cut strips 10–15 cm wide from an old compost bag or sturdy carrier bag. Newspaper can also be used, though it decomposes faster and requires slightly more careful watering.
Step-by-step: how the snail is built
1. Prepare the strip
Spread the plastic or newspaper flat, then cut it into a long strip roughly the width of a hand. A longer strip holds more seeds, so some gardeners join two strips with tape to make a larger roll.
Lay a piece of kitchen paper or thin fabric along its length. This layer retains moisture and prevents compost spilling as the strip is rolled.
2. Add compost and moisture
Distribute a light layer of fine seed compost over the full length of the strip, keeping a narrow gap along the upper edge to stop soil escaping during rolling.
Moisten the compost gently. It should be as damp as a squeezed-out sponge rather than saturated. Excess water may cause seeds to rot before germination.
3. Position the seeds
Arrange the seeds in a row on the compost, allowing a few centimetres between each one so that developing stems and roots have sufficient space.
Spacing the seeds properly inside the roll makes later transplanting calmer and far less fiddly.
Salad leaves, basil, petunias and brassicas are particularly suitable, as their seeds are small and quick to germinate. Bigger seeds such as beans can also be used, although they make the roll more bulky.
4. Roll and stand the snail
Beginning at one end, roll the strip carefully but firmly, ensuring the seeds and compost remain enclosed. The aim is a compact spiral, rather than a tightly compressed tube that crushes the seeds.
Set the finished snail upright in a saucer or small container. Add a little water to the bottom so the paper layer can draw moisture upwards, then place it somewhere bright and temperate.
Caring for seedlings in a roll
Over the next few days, the main priorities are light and measured watering.
- Test the top of the compost each day for moisture. It should remain gently damp.
- Refill the saucer when it has dried, but do not allow the bottom to remain waterlogged.
- Position the roll by a sunny window or beneath a grow light to avoid weak, leggy growth.
Most seeds germinate within one or two weeks. When the first true leaves emerge – the second pair of leaves following the small seed leaves – seedlings are generally sturdy enough for individual modules or direct planting into beds, depending on outdoor temperatures.
Transplanting from the snail without damage
The method’s greatest advantage appears when it is time to transplant. Rather than prising seedlings from tightly packed cells, the spiral can be gradually opened out.
Bring the roll to the potting area, carefully place it on its side and begin unrolling from the outer edge. Each seedling will sit in its own portion of compost, with its roots facing downwards.
Handled gently, the snail opens like a book of seedlings, each one ready to be lifted with almost no root disturbance.
Use a small spoon, dibber or even the handle of a teaspoon to slide beneath each plant before transferring it to its new pot or bed. Water plants in using a watering can with a soft rose, helping the soil settle around the roots.
What works best in a snail roll?
Crops do not all respond in the same way, and gardeners are gradually identifying the seeds that are best suited to this method.
- Well suited: lettuces, Asian greens, cabbages, leeks, onions, marigolds, cosmos, many herbs.
- More delicate: very fine seeds such as celery or certain alpine flowers, which may be more difficult to space.
- Less ideal: large, rapidly growing seeds such as courgettes and beans, which can soon outgrow the roll.
For newcomers, a seed roll of cut-and-come-again salads or basil provides quick, visible results and useful plants.
Risks, limits and how to avoid problems
Like all seed-starting techniques, the snail method has a few potential drawbacks.
As seedlings are positioned closely together, inadequate ventilation can lead to mould when conditions remain excessively wet. Leaving some space between rolls and placing them in a bright, airy location helps reduce the risk.
A further problem can be dry compost at the top while the base remains wet. Occasionally turning the roll and checking its moisture level by touch can help maintain a balance.
Timing is also important. If seedlings are left in the roll for too long, roots may become tangled, making them more difficult to separate. The arrival of true leaves is a useful signal that it is time to move them on.
Why this method suits thrifty and eco-minded gardeners
As well as being practical, the snail roll reflects a broader change in gardening habits. Many home growers are seeking to reduce their use of new plastic, particularly after seeing how quickly pots split and accumulate in sheds.
Using packaging, newspaper and offcuts of old fabric fits that approach. Even where the outer layer eventually decomposes, its brief second use can raise a tray of plants without the need to buy additional containers.
For gardeners with little space, a limited budget or simply an interest in gardening hacks that genuinely work, this unassuming spiral of compost and seeds offers an attractive replacement for another pile of plastic pots.

Comments
No comments yet. Be the first to comment!
Leave a Comment