
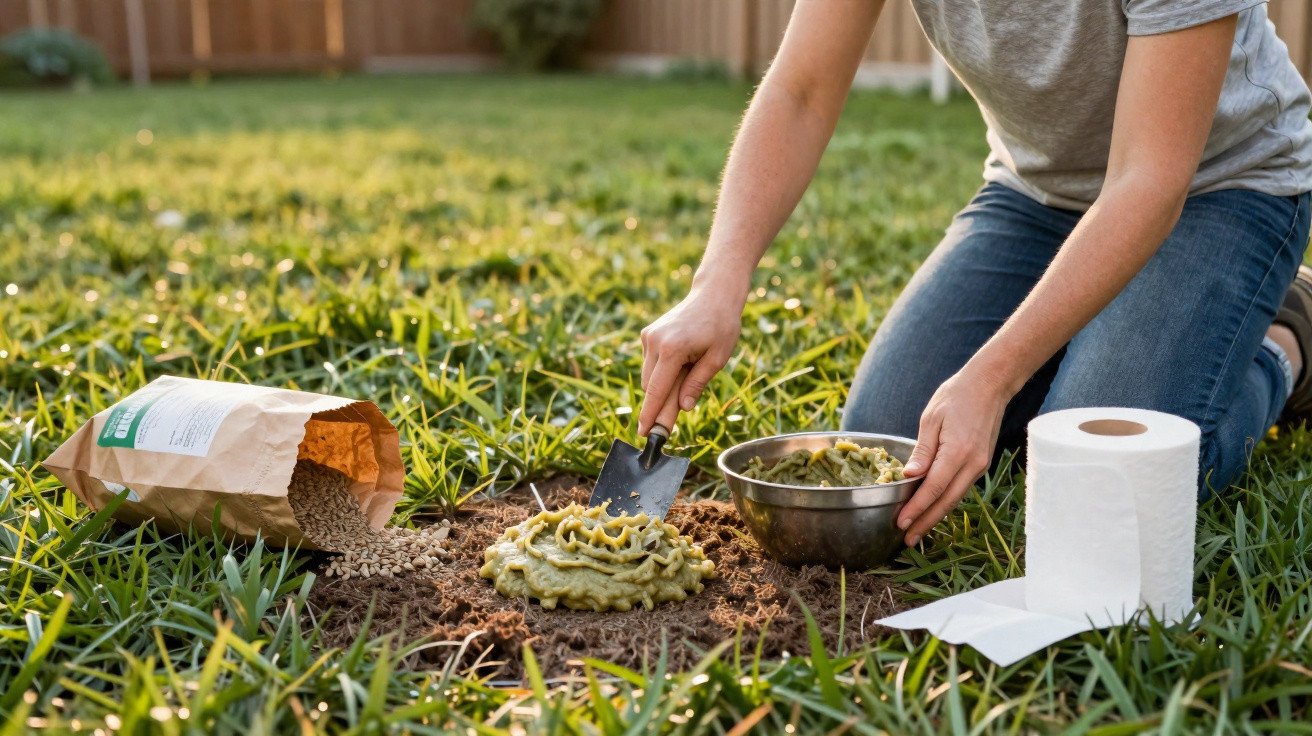
Many garden owners will recognise the sight: rather than a dense green lawn, spring reveals a patchy carpet of soil, moss and dried-out blades. If you do not want to reach for an expensive professional product straight away, a remarkably simple DIY solution can help. It is currently going viral on social media – and works surprisingly well.
Why the lawn looks so battered after winter
Lawns are more delicate than they appear. A number of factors can cause bare patches to develop over the year:
- heavy foot traffic, particularly along paths or in play areas
- periods of heat and drought in summer
- frost and waterlogging in winter
- dog urine or localised over-fertilising
- shaded spots beneath trees or beside walls
The outcome is always equally frustrating: instead of an even surface, you are left with a pattern of brown holes. Many people then buy costly lawn overseeding mixes containing special additives intended to retain water. That very function can be recreated remarkably effectively with a bathroom product.
The toilet paper trick: how it works
Garden enthusiasts on video platforms are currently showing a technique that combines grass seed with soaked toilet paper. The paper creates a type of biodegradable mini-propagator for the seeds.
"Toilet paper holds moisture directly against the seed surface, protects it from drying out – and makes it harder for birds to peck the seeds away."
This tackles a problem that often causes conventional overseeding to fail: fine seeds dry out too quickly in the sun or are picked up as a snack by blackbirds and other birds. The paper fibres act like a sponge, retaining water while also keeping the seed in place.
The “lawn paste”: how to mix the seed-and-paper mixture
These three items are all you need
- 1 roll of plain toilet paper, uncoloured and fragrance-free
- 1 bucket of water, preferably rainwater
- grass seed suited to your existing lawn
Step-by-step instructions
- Prepare the area: Rake over bare patches, removing dead grass, moss and stones. Loosen the soil lightly.
- Soak the paper: Tear the toilet paper into rough pieces, place them in the bucket and cover with water. Leave it for a few minutes.
- Break up the paper: Stir and squeeze it with your hand or a wooden stick until it forms an even, pulp-like mixture with no lumps.
- Mix in the seed: Stir the grass seed into the pulp until the grains are evenly distributed throughout the paper. The mixture should be moist, but not excessively runny.
- Apply it: Spread the seed-and-paper paste thinly over the bare areas using your hand or a spatula, no more than a few millimetres thick.
- Press it down: Gently firm it with the palm of your hand or a board so that the paste makes contact with the soil.
- Water carefully: Use a watering-can rose to water gently, taking care not to wash the mixture away.
With suitable temperatures, the first delicate shoots can emerge after just three to five days. The paper remnants gradually break down once soil microorganisms begin working on them.
Why toilet paper protects the seed
The method offers several benefits at the same time:
- Moisture retention: The fibres hold water like a sponge directly against the seed coat.
- Protection from birds: The grains are concealed within the fibrous mixture, making them harder for birds to reach.
- Anchoring to the ground: Wind and heavy rain are less likely to wash away the lightweight seed.
- Slow decomposition: Over time, the paper decomposes and makes a minimal contribution to humus formation.
This anchoring is especially useful on slopes or in spots where watering quickly washes material away. Rather than leaving bare runnels, new grass grows back far more evenly there.
Choosing the right grass seed: otherwise the lawn becomes patchy
Even the best method is of little use if you choose the wrong seed mix. Simply buying any bag labelled “grass seed” from a DIY shop risks colour differences and uneven growth rates. The result can be bright light-green patches in the middle of an older, darker lawn.
Garden centres sell mixes for different uses:
- shade lawn seed for areas beneath trees
- play and sports lawn seed for heavily used spaces
- ornamental or general-purpose lawn seed for ordinary gardens
Ideally, select a mix that matches your existing lawn as closely as possible. If you cannot remember the original seed type, dig up a small handful of grass and ask a specialist retailer for a comparable mix. Higher-quality seed germinates more successfully and grows into a more resilient lawn.
The best time for a lawn makeover
The toilet paper method does not work equally well throughout the year. Two periods provide ideal conditions:
- Spring: Once night frosts are no longer expected and the soil has noticeably warmed up.
- Early autumn: The ground still retains summer warmth, while rainfall provides regular moisture.
By contrast, the height of summer is poorly suited to the job. The paste dries out too fast, while constant watering puts fresh seedlings under strain. If you absolutely must overseed in summer, provide shade around midday and water more frequently, but very gently.
Care tips for the first few weeks
The first weeks after sowing are particularly important if tiny seedlings are to develop into a hard-wearing green carpet.
"In its early stage, fresh grass needs plenty of peace, consistent moisture and, above all: no close cut."
- Avoid walking on the area wherever possible for the first three to four weeks.
- Keep the surface moist rather than wet; water more often but for shorter periods.
- Mow for the first time once the blades are around eight to ten centimetres tall.
- Set the mower higher for the first cut and trim only the tips.
Those who remain patient will be rewarded with a much denser lawn than dry seed scattered on its own usually produces.
Pets and the environment: what to consider
Dogs and cats may find the unfamiliar paste interesting. Dogs in particular tend to sniff at it and may, unfortunately, even nibble it. While the paper itself is biodegradable, a combination of cellulose and larger quantities of seed can cause digestive problems.
If you have pets, fence off treated areas for the first few days or do not leave animals unsupervised there. Once the paper is barely visible and the seedlings have emerged, the risk drops considerably.
From an environmental perspective, this approach is suitable for repairing individual spots in a domestic garden. Treating entire lawns or meadows with paper pulp unnecessarily burdens the soil and disturbs small organisms. For large areas, conventional overseeding methods using a light covering of compost or sand remain the more sensible option.
When the trick is especially worthwhile – and when it is not
The toilet paper method is at its best where standard overseeding repeatedly fails: in small, persistent problem areas. Examples include worn paths leading to the patio, patches in front of a swing, or corners that the lawn sprinkler struggles to reach.
In very clay-heavy soil that quickly forms a crust after rain, the fibrous structure also helps keep the surface a little looser. In sandy soil, the water-retaining paper fibres provide seedlings with a few crucial extra hours of moisture before the next watering session is due.
The technique is less useful where the lawn is heavily thatched overall or dominated by weeds. In that case, patching it is only a temporary fix. A more fundamental restart involving scarifying, soil preparation and broad reseeding is more worthwhile.

Comments
No comments yet. Be the first to comment!
Leave a Comment