
A nearly forgotten professional trick changes that completely.
Anyone hoping to harvest sturdy, thick leek stems from the bed in winter needs to do more than water and fertilise them occasionally. For decades, professional vegetable growers have relied on a clear routine of trimming, a mud bath and deep planting. Although the approach may look somewhat rustic, it produces noticeably stronger plants and helps the tender white shaft become substantially thicker.
Why your leeks stay thin despite good care
Many gardeners have the same experience: young plants go into the ground in spring, receive regular water throughout summer, and then disappoint in autumn. The stems are long but skinny, the white section is short, and fungal diseases or pests may appear as well.
The cause is often not the fertiliser but the transplanting technique. Simply pushing seedlings quickly into a shallow hole wastes three important advantages:
- too little stimulation for the roots
- excessive water loss through the leaves
- short shafts with very little blanching
“Three factors are crucial: targeted trimming, root protection with a ‘mud bath’, and much deeper planting with enough space between plants.”
This is exactly where the old gardeners’ technique comes in. It may seem rather harsh, but it gives the plants a powerful boost in growth.
The professional leek method: trim, dip and plant deeply
Preparation starts one or two days before planting rather than on the day itself. If you have raised your own seedlings, lift them from the bed once they are roughly pencil-thick. Bought plants can be treated in exactly the same way.
Step 1: Lift the young plants and let them dry slightly
First, carefully dig up the small leek plants. Shake off the loose soil and lay the plants flat next to one another on the ground. Leave them there for 24 to 48 hours so that they can dry a little. This brief “shock” strongly encourages root formation afterwards.
There is no need to worry: provided sun and wind are not extreme, leeks cope well with this break. Slight drying directs the plant’s energy towards producing a fresh, vigorous root system.
Step 2: Trim the leaves and roots
Next comes the so-called trimming stage. This is when you should use the scissors decisively:
- shorten the leaves by around one third
- cut the roots back to approximately 1–2 centimetres
Shortening the leaves reduces evaporation. The plant loses less water and can devote its energy to new roots and the shaft. Root pruning acts as a signal: the plant responds by making many fine new roots, which absorb water and nutrients far more effectively.
“The bold cut marks the beginning of a new, dense root network – the foundation for thick, sturdy stems.”
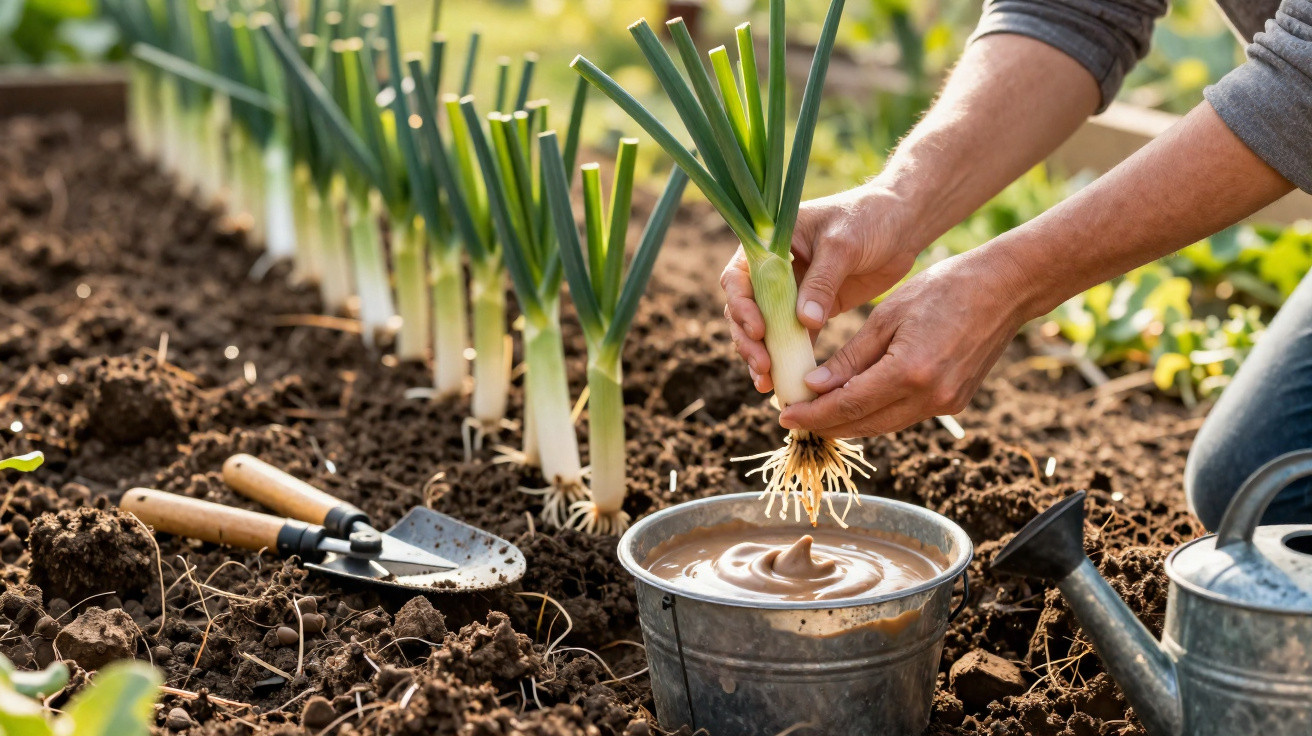
Step 3: Dip the roots in ‘praline mud’
Before the plants return to the bed, their roots receive a protective coating. Mix a thick liquid in a bucket, with a consistency similar to pancake batter:
- finely sieved garden soil
- mature compost
- water
Stir everything into a thick mud. Thoroughly dip the root ends of the prepared leek plants into it. Each plant should be covered with an even layer. This “mud bath” prevents the roots from drying out, coats them with nutrients and ensures immediate good soil contact in their new bed.
If you would like to take the method a step further, add a little cooled horsetail liquid feed or a handful of fine wood ash. Both strengthen the young plants and supply extra minerals around the roots.
Planting leeks correctly: deeper trenches, more white and greater thickness
The second part of the technique takes place on planting day: deep trench planting. This determines how long and substantial the white shaft will become.
When is the best time?
For winter leeks, a planting window from around mid-June to mid-July has proved effective. By then, the plants are robust enough to cope well with trimming and still have several months in which to grow. When treated correctly during this period, they form a substantial shaft that can also withstand frost.
How to make the planting trench properly
Rather than digging individual holes, create one continuous trench. It can be 10 to 15 centimetres deep. Stand the prepared young plants upright in this trench.
- Depth: 10–15 cm for a long, white shaft
- Spacing within the row: at least 15 cm between plants
- Row spacing: 30–40 cm, leaving enough room for earthing up later
At first, water the plants only lightly and do not fill the trench completely. Soil will gradually fall into it over time, while you should also earth up around the plants deliberately. This lengthens the blanched shaft bit by bit.
“The less light reaches the lower part of the plant, the longer and more tender the white leek section becomes.”
Professional-style aftercare: a second trim, water and nutrients
To ensure the stems truly grow thicker, leeks need regular but straightforward care after this initial start.
Summer: the second leaf ‘haircut’
Once the plants have produced fresh green growth again, give them a second, lighter trim. Cut the leaf tips back once more, stopping just above the point where the firm shaft changes into leaves. This further reduces evaporation and makes the plant put even more energy into root mass and shaft thickness.
It also removes a favoured target area for pests, which often lay their eggs on the leaf tips.
Fertiliser: targeted, never excessive
Leeks are hungry feeders and benefit from nitrogen, but only in moderation. Organic fertilisers are especially suitable, for example:
- horn shavings or horn meal for a slow, steady supply
- blood meal for a rapid growth boost
- guano or bone meal, depending on the soil and available supplies
Add one portion to the trench at planting time, then give one or two smaller top-ups later according to the condition of the soil. Too much nitrogen makes leeks soft and more susceptible to disease. Light hoeing from time to time loosens the ground, supplies the roots with oxygen and helps activate nutrients.
Watering, earthing up and mulching: the trio for thick stems
Leeks tolerate sunshine well enough, but they react sensitively to prolonged dry spells. The soil should never be allowed to dry out completely in summer. A watering routine adapted to the weather and soil type keeps the plants growing.
Several times during the season, draw soil up around the stems; this is known as earthing up. It:
- extends the blanched white shaft
- gives the plants greater stability
- keeps the root area moist for longer
A mulch layer of grass clippings, chopped straw or leaves around the plants protects against evaporation, maintains a loose soil structure and feeds soil life over the long term – all of which supports vigorous, healthy plants.
Why this ‘hard’ start produces leek stems twice as thick
For many home gardeners, cutting back roots and leaves initially feels counterintuitive. In practice, however, the plant responds to this intervention with a clear growth boost. The newly formed mass of fine roots supplies the leek more effectively, deeper planting promotes long white shafts, and wider spacing prevents competition for nutrients.
Anyone using this approach will quickly see the difference when lifting the crop in winter: the stems fill the hand, the white section is noticeably longer, and the flesh is firm and juicy. There is then plenty to use in soups, stews and bakes – from the same bed area as before, simply prepared more effectively.
Interestingly, many of these measures can also be applied to other crops. A short drying period, a well-adhering root mud and deep, loose planting can likewise benefit celery, cabbage or relatives of the leek. Those who try small test rows in their own garden soon learn how their plants respond.
One further point is often underestimated: the handling of organic fertiliser and soil life. Living, humus-rich soil is constantly working in the background. Combined with the technique described here, it creates a genuine turbo effect. Plants root more deeply, draw water from lower layers and cope much better with weather extremes.


Comments
No comments yet. Be the first to comment!
Leave a Comment