
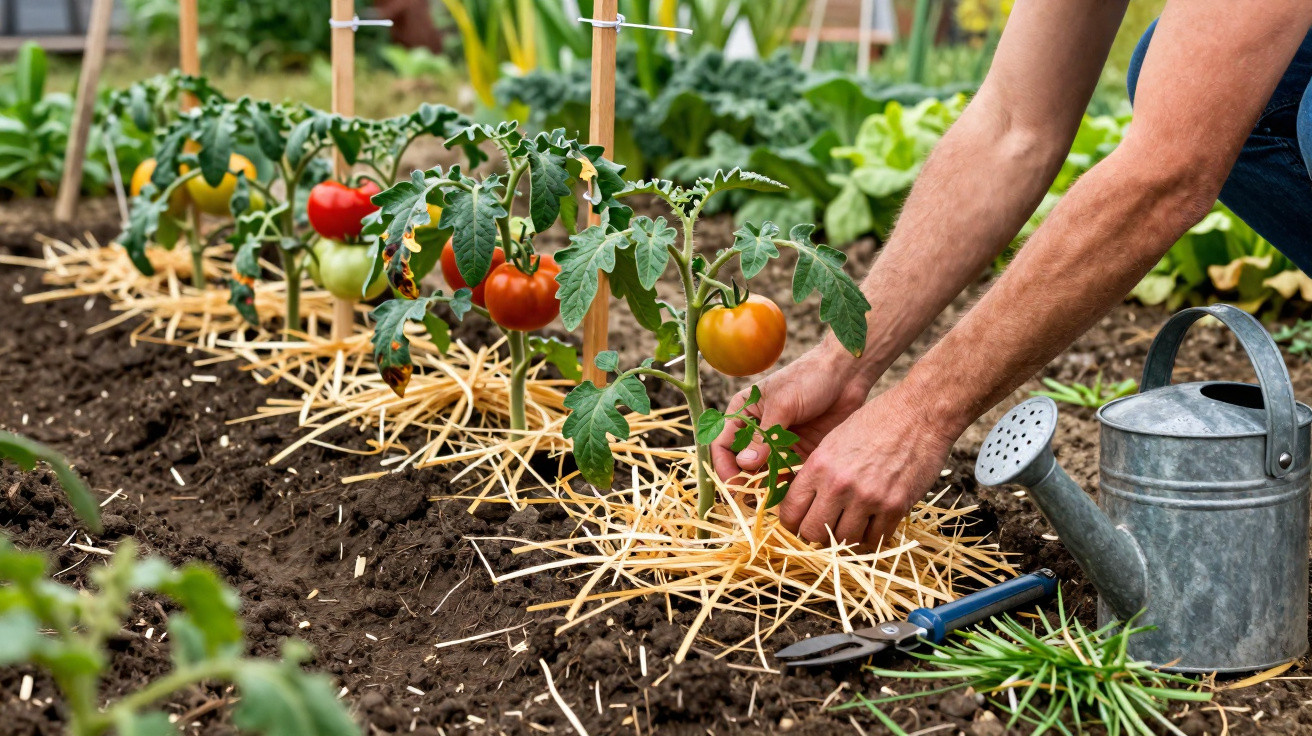
Spring brings light, warmth and tomato plants to garden centres. At the same time, the peak season for fungal diseases begins, including the dreaded tomato blight. Anyone who has watched leaves, stems and fruit rot away within a few days approaches the first planting of each year with an uneasy feeling. Yet one simple, natural measure taken right at the base of the plant can greatly reduce this risk - while also producing stronger tomatoes over a longer harvesting period.
Why tomatoes are so vulnerable to fungal infections in spring
Tomatoes love warmth, but they react very sensitively when wet weather coincides with soil that is still cool. That combination often persists for weeks in spring: sunshine during the day, chilly nights, plus rain, watering and dew - ideal conditions for fungal spores.
Infections often begin almost unnoticed:
- the lower leaves develop small yellow or brown spots;
- the spots spread and the leaves dry out;
- eventually, fungi attack the stems and fruit too, causing tomatoes to rot while still on the plant.
The crucial area is not the foliage at the top of the plant, but the soil below it. Rain and watering splash soil onto the lower leaves. That soil can contain fungal spores simply waiting for moisture and susceptible leaf tissue.
The critical “splash zone” is immediately above the soil - protecting it breaks the chain of infection.
If plants are also crowded together, receive little air movement and are watered from above onto their leaves, they stay wet for a long time. These are perfect conditions for fungal diseases to spread rapidly through an entire crop.
The natural shield at ground level: mulching tomatoes properly
The simplest and most effective preventative measure is a natural protective layer around the tomato root zone. Gardeners call this mulch or a mulch layer: organic material placed directly on the soil.
Suitable materials include:
- straw;
- thoroughly dried grass clippings;
- hay;
- leaves collected in autumn;
- woodchips or BRF (woodchips made from fresh prunings);
- if necessary, newspaper covered with a thin layer of organic material.
This mulch layer acts as a protective shield in several ways:
- Water lands on the mulch rather than bare soil, preventing the feared splashing.
- The upper few centimetres of soil retain moisture more evenly, so plants experience less stress.
- Weeds struggle to establish themselves, reducing competition for water and nutrients.
Most importantly, the lowest tomato leaves should touch neither the soil nor the mulch. Lightly thinning out the lower leaves further reduces the surface available for fungal attack.
The right timing: why patience pays off
Although it may be tempting to apply a thick mulch layer as soon as tomatoes are planted, mulching too early can slow the start of the season. Organic mulch insulates the soil from above and below, meaning the ground warms up more slowly.
Soil that is too cold slows root growth, leaving plants smaller and pushing the harvest back.
This timetable is a reliable approach:
- Do not plant tomatoes until there is no longer a risk of overnight frost.
- Allow plants to establish roots for two to three weeks without a mulch cover.
- Roughly check the soil temperature: place your hand flat into the soil. It is usually suitable once it no longer feels cold; aim for at least around 12 degrees.
- Only then apply mulch - but do so thoroughly and at a sufficient depth.
A soil thermometer gives a more precise reading. In professional vegetable growing, 12 to 14 degrees at the planting site is a common guide for tomatoes to begin growing properly.
How thick the mulch layer around tomatoes should be
A very thin layer offers little benefit, while an excessively thick one can rot in very wet weather or attract slugs. Typical depths used in vegetable gardens are as follows:
| Material | Recommended layer depth |
|---|---|
| Straw / hay | 8–10 cm |
| Dry grass clippings | 3–5 cm, preferably in several thin layers |
| Leaves | 5–8 cm, lightly loosened |
| Woodchips / BRF | 5–7 cm, combined with some grass clippings |
Leave a small gap immediately around the stem. Keep a ring of bare soil about five centimetres wide around each plant so that the stem is not constantly in contact with moisture. This helps prevent rot at the root collar.
Mulching mistakes that weaken tomatoes
Not every type of mulch automatically has a positive effect. Small home gardens in particular can develop common problems that are easy to avoid.
Too much fresh grass clippings
Fresh grass clippings contain a great deal of nitrogen and quickly begin to ferment. When applied in thick layers, they form a dense, rotting mat with little air circulation; it drains rainwater poorly and is highly attractive to slugs.
- Always let grass clippings dry first, until they are no longer soaking wet.
- Apply several thin layers rather than one thick pile.
Woodchips without compensation
Woody materials such as BRF or coarser woodchips temporarily lock up nitrogen in the soil as they decompose. If few other nutrients are available, tomatoes may consequently grow paler and more weakly.
To counter this:
- place a thin layer of dried grass clippings beneath the woodchips; or
- work some mature compost into the upper soil layer beforehand.
Slugs beneath the mulch layer
Slugs particularly enjoy mulched areas in regions with frequent rainfall. Tomatoes are not their absolute favourite food, but young plants can still be readily nibbled.
A strategy for gardens at risk:
- Wait until late May or early June before mulching.
- Check beneath the mulch layer regularly for slugs.
- If needed, give young plants extra protection with slug collars during their first few days.
Watering, side-shoot removal and spacing: measures that strengthen protection
Mulch around the base is the key component, but it is not the only one. Combining several measures markedly reduces fungal pressure.
- Water only at soil level: Apply water directly to the roots, ideally beneath the mulch layer. Wet foliage encourages fungal infections.
- Allow enough space: Leave at least 60 centimetres between two tomatoes in a bed; for vigorous cordon tomatoes, allow 80 centimetres instead. This improves air circulation.
- Remove the lowest leaves: Once plants are established, thin out the lower rows of leaves so that no leaf touches soil or mulch.
- Remove side shoots regularly: Pinch out shoots in the leaf axils so plants do not become too dense and can dry more quickly.
The faster leaves dry after rain or dew, the more difficult it is for fungal spores to take hold.
What causes tomato blight and similar problems
Many home gardeners simply refer to a “fungus” when tomatoes become ill. In most cases, however, the symptoms are caused by particular groups of pathogens that are highly adapted to damp conditions. They produce tiny spores that survive in the soil, on plant debris or on supports, then become explosively active when the weather is favourable.
The bad news is that they can never be completely prevented outdoors. The good news is that reducing moisture at the base of plants, limiting splash zones on leaves and avoiding sharply fluctuating soil conditions removes a large part of these pathogens’ opportunity to attack.
A practical example of a robust tomato crop
A tried-and-tested routine for a home garden looks like this:
- Plant tomatoes in late spring in a sunny, airy location, ideally against a house wall with protection from rain.
- Let them root in well, watering regularly but not excessively - always at ground level.
- After two to three weeks, loosen the soil lightly again, then add a mulch layer of straw and dried grass clippings.
- Remove the lowest leaves as soon as plants are strong enough.
- Inspect plants once a week: check leaves, stems and the mulch surface. Remove the first suspicious leaves consistently.
Gardeners who follow this approach notice over a few years how much more stable the bed becomes: less severe fluctuation during dry spells, significantly fewer losses from fungal diseases and a generally more relaxed response to changeable summer weather.
Mulching at the base of tomato plants is not a miracle cure that eliminates every disease. Instead, it is a smart framework that shifts the microclimate around plants in your favour. Together with targeted watering and an airy position, it turns a sensitive diva into a remarkably resilient crop that reliably bears fruit from June into autumn.

Comments
No comments yet. Be the first to comment!
Leave a Comment