
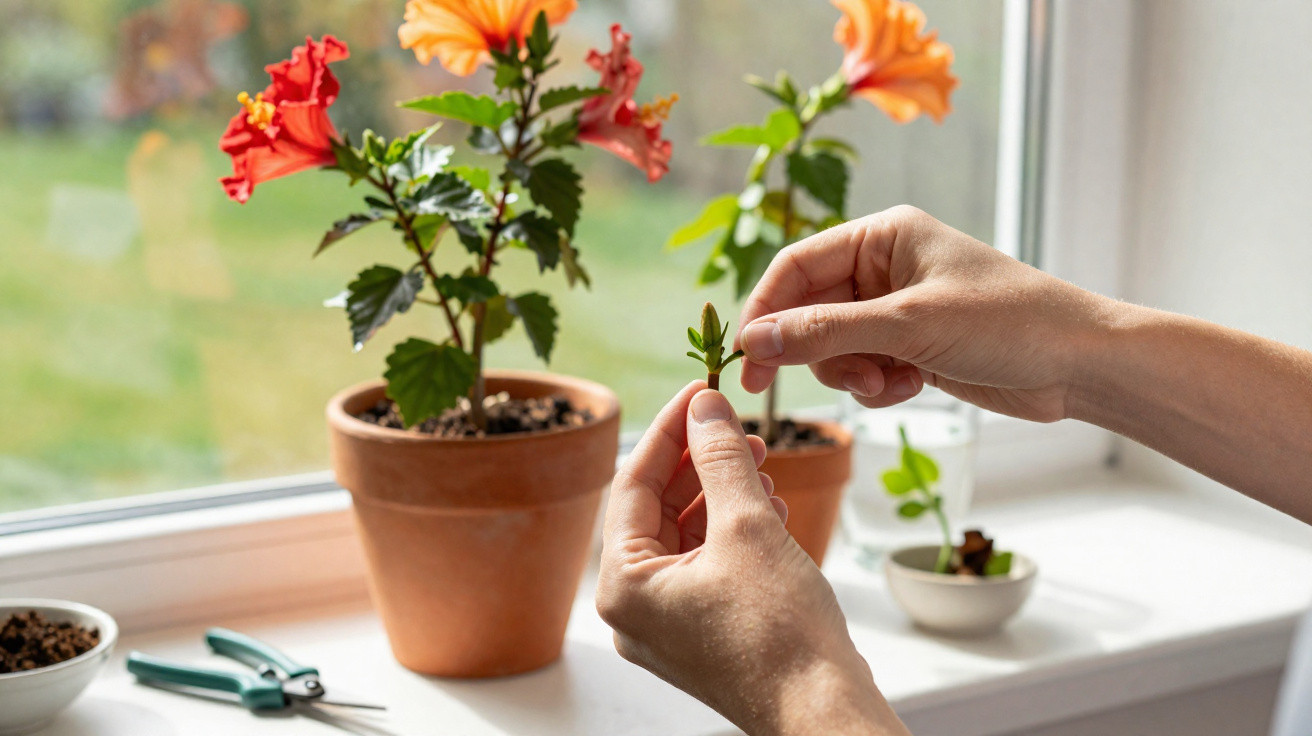
Many hibiscus owners will recognise the pattern: a few flowers at the top, bare stems below, and long, slender shoots stretching towards the window. By late winter, the plant can look tired and rather forlorn. Yet it is precisely during this period, between the end of winter and the start of spring, that one straightforward technique can make the number of flowers soar - provided it is used at the right time and in the right place.
Why March is the crucial month for hibiscus
Towards the close of winter, hibiscus is already beginning its internal restart. As daylight lengthens and temperatures gradually rise, the plant switches from energy-saving mode to active growth. Sap starts moving up through the shoots, buds begin to awaken, and hormonal activity increases noticeably.
This particular period - roughly from early March to mid-April - is considered the ideal time for a little targeted intervention. The hibiscus has sufficient stored energy to respond quickly, yet it is not dealing with summer heat stress. Cuts and care measures heal rapidly, the plant produces strong new growth, and it copes far better with small “operations” than it would at the height of summer.
The effect is especially clear with:
- Hibiscus rosa-sinensis grown in pots on a windowsill or in a conservatory
- Hibiscus syriacus planted in a garden border or kept in a container on a balcony or terrace
- Hibiscus moscheutos once its fresh shoots emerge in spring
“Anyone who intervenes correctly during this short window redirects growth away from long, bare stems and towards numerous flower-rich side shoots.”
The 3-second technique: how to double the flowering shoots
The actual method sounds almost too easy: remove the uppermost growing bud from a young, soft shoot tip. Gardeners call this “pinching out the plant shoot”. This tiny cut takes only seconds, but it has a major impact on branching.
How to do it step by step
Choose a shoot that has already grown and carries around three or four pairs of leaves. Its tip should still be soft and flexible rather than woody.
- Wash your hands and disinfect your fingernails or tool, such as small scissors, with alcohol.
- Examine the shoot tip briefly: identify the last pair of leaves and the next node.
- Hold the tip between your thumb and forefinger immediately above a node.
- Pinch it off with one clean, quick movement, or cut it away with small, sharp scissors.
That is all there is to it. The treatment genuinely takes only around three seconds per shoot. The key is to work solely on young, non-woody growth and not to remove a flower that has already fully formed.
The science behind the technique: apical dominance
The method works because of a basic process in plant biology known as shoot-tip dominance, or apical dominance. The top bud of a hibiscus releases plant hormones, particularly auxins. These compounds suppress the growth of dormant buds along the sides of the stem.
As long as the tip remains undisturbed, the plant mainly directs its growth upwards, while side shoots stay weak or remain dormant altogether. Once that tip is removed, the auxin source disappears and the plant suddenly distributes water and nutrients differently.
“By removing the shoot tip, you release the brake on the side buds - one bare stem becomes two or three new flower-bearing branches.”
Put simply, a single upright shoot develops into two or three branches within a few weeks. Each of these new branches can, in turn, form buds. In practical terms, this produces at least twice as many flowering shoots, and often even more if they are lightly pinched again later on.
A common problem: the ‘feather duster’ by the window
The difference is particularly striking with hibiscus plants kept indoors behind glass. They grow strongly towards the light, becoming increasingly dense at the top and progressively barer at the bottom. Without action, they can eventually resemble an elongated feather duster with a handful of flowers at the tip.
This is exactly where the 3-second technique acts like a reset. Pinching out the tip forces the plant to activate buds lower down. It sends out fresh growth closer to the base, develops a more compact, bushier shape, and later distributes flowers across the whole plant rather than only around the crown. In addition, turn the pot slightly every one to two weeks so that the hibiscus does not gradually “move” towards the window on one side.
What you should never pinch out
Despite its simplicity, there are a few limits to bear in mind:
- Do not use your fingers on thick, heavily woody branches; these require a proper, carefully planned pruning cut.
- Do not remove shoot tips that already carry a clearly developed flower bud.
- Do not pinch at a weakened or diseased hibiscus; first identify the cause, such as pests, waterlogging or nutrient deficiency.
If conditions are reasonably suitable, the first new side shoots generally appear after two to three weeks. During this period, hibiscus benefits from plenty of light, evenly moist growing medium and a modest feed.
Make clever use of the removed tips: free new hibiscus plants
There is no need to throw the small shoot tip away. If it is around 10 cm long, it is ideal for use as a cutting. This gives you new young plants at no additional cost.
Cuttings in compost: the traditional method
Prepare a hibiscus cutting for rooting in compost as follows:
- Cut the cutting at an angle directly below a node.
- Remove every leaf from the lower section so that nothing rots in the growing medium.
- Leave two to four leaves at the top, cutting each one in half to reduce moisture loss.
- Briefly dip the cut end in rooting powder or a liquid made from willow twigs.
- Insert it into a pot filled with very loose, lightly moist growing medium.
Place the pot somewhere bright but away from direct sunshine, at temperatures of around 15 to 20 °C. Keep the compost lightly moist rather than wet. After several weeks, new leaves should emerge, indicating that roots have formed.
Cuttings in a glass of water: the easy option
The glass method is even simpler: put the prepared cuttings into a glass of tap water, making sure that no leaves are submerged. Change the water every two to three days to prevent bacteria from multiplying excessively. In favourable conditions, the first roots often appear after only around two weeks.
“One cut delivers a double benefit: more flowers on the parent shrub and free new hibiscus plants from the removed tips.”
Care around the March technique: giving hibiscus the best support
For the 3-second technique to achieve its full effect, the hibiscus needs suitable conditions. Several factors are particularly important:
- Light: provide as much as possible; indoors, position it directly by a window, while outdoors choose a full-sun or very bright location.
- Water: maintain even moisture but avoid waterlogging. Do not allow the root ball in a pot to dry out.
- Fertiliser: from March onwards, feed regularly but moderately, roughly every two weeks, using a flowering-plant fertiliser.
- Temperature: indoor hibiscus enjoys temperatures of 18 to 23 °C; garden hibiscus should remain in a sheltered spot until after the last frosts.
Anyone who provides these conditions will see not only more shoots, but also noticeably more buds and longer flowering periods. Hibiscus generally responds very well to a combination of light, warmth, nutrients and targeted pinching out.
What ‘apical dominance’ means - explained simply
The term may sound like university-level biology, but in everyday gardening it is directly linked to abundant flowers - or the lack of them. Auxins are concentrated in the shoot tip, and these hormones effectively tell the plant: “Grow upwards; everything else can wait.”
When this command point is removed, other hormones, including cytokinins, become more influential. They encourage the side buds that had previously been held back to grow. This explains why such a minimal intervention at the top can alter the entire growth habit of a hibiscus - transforming a long-stemmed “giraffe” into a rounded flowering shrub.
Risks, mistakes and how to avoid them
The treatment is not entirely risk-free, but the usual pitfalls are easy to avoid. Pinching too late in the year, especially in high summer, may remove buds that the plant has already set. Its main flowering period can then be delayed or less impressive. For that reason, stay within the window from early March to no later than mid-April.
Another mistake is cutting too roughly or working with dirty tools. Bacteria or fungal spores can then enter the fresh wound. A clean blade or disinfected fingernails greatly reduces this risk. If the hibiscus is visibly weakened by spider mites, root damage or severe leaf loss, recovery must take priority over reshaping. The 3-second technique is only truly worthwhile once the plant is producing stable new growth.
Trying the method first on one or two shoots will quickly help you understand how your own hibiscus responds. Many amateur gardeners say they reach for the scissors again every early spring afterwards, because they can see the transformation from a weak stem into a flower-filled globe for themselves.

Comments
No comments yet. Be the first to comment!
Leave a Comment